
How to Clean Ceiling Fan Blades Without Dusting the Whole Room
Ceiling fan blades collect a thick felt of dust that rains down the second you wipe them the wrong way. Here is the pillowcase method I use to trap every bit of that dust, plus how to cut through sticky kitchen grease film and keep the blades clean for months.
Jump to a section
- What you'll need
- Step-by-step
- Turn the fan off and let it stop completely before you climb up
- Use the pillowcase method so the dust falls inside, not on you
- Wipe off the sticky film the pillowcase leaves behind
- For kitchen fans, cut the grease with a vinegar solution
- Clean the light fixture, globes, and bulbs while you are up there
- Do not forget the motor housing and pull chains
- Pro tips
- FAQ
What You'll Need
Step-by-Step Instructions
Turn the fan off and let it stop completely before you climb up
This sounds obvious, and it is the step people skip in a hurry, then regret. Turn the fan off at the wall switch and, if you have a remote, set it aside so no one flips it back on while your hands are near the blades. Wait until the blades have coasted to a full stop, because a slowly spinning blade is exactly at head and hand height on a ladder and it will catch your wrist. If the fan shares a switch with the room light, leave the light on so you can actually see the dust, or bring a work light, because overhead dust hides in shadow. Position a sturdy step stool or ladder directly under the fan, not off to the side where you have to lean, since leaning while you reach overhead is how people fall. Test that the stool is level and locked before you put weight on it. If your ceilings are high and you cannot reach the blades with both feet planted and one hand free, stop and use an extendable duster from the floor instead, which I cover later. The goal for this whole job is that you are stable and the fan is dead still before a single cloth goes up. Clear the floor under the fan too, so if any dust does escape it lands on bare floor you can sweep, not on furniture.
Use the pillowcase method so the dust falls inside, not on you
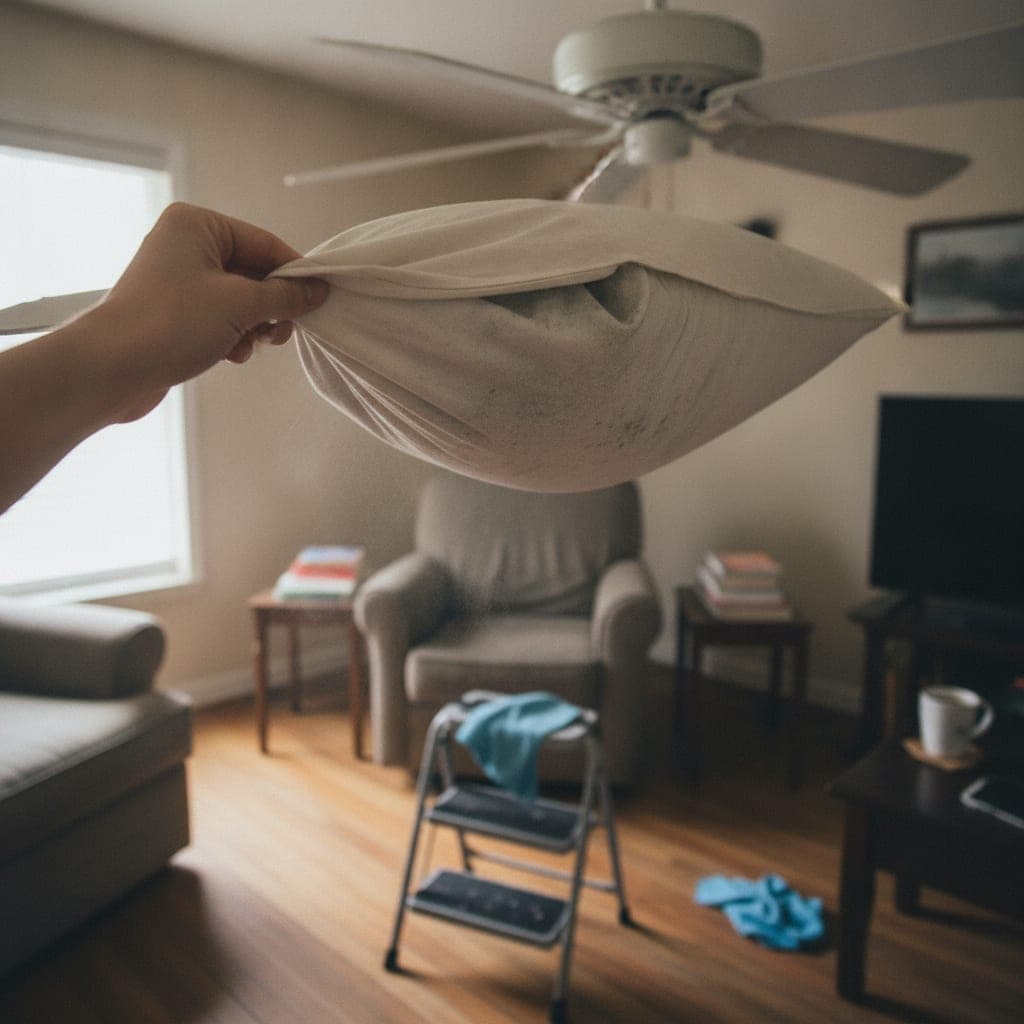
This is the trick that makes ceiling fans easy, and once you do it you will never wipe a blade the open way again. Take an old cotton pillowcase and slide it over one blade like a sleeve, all the way to the base near the motor. Then press the top and bottom of the case gently against the blade and pull it back toward you in one slow stroke. The dust and the felt of grime on top of the blade get wiped off and captured inside the pillowcase instead of snowing down onto your bed, your dresser, and your face. Do each blade the same way, top and bottom caught in the fabric. The reason this works so well is that fan blades collect dust mostly on the top surface, out of sight, and any normal wipe from below just knocks that layer straight down. The pillowcase encloses the blade so gravity keeps the debris in the bag. Go slowly on the first pull; a fast yank flings dust out the open end. When the inside of the case is coated, turn it inside out or move to a clean section of fabric. When you are done, carry the pillowcase outside or straight to the trash or laundry and shake it out there, never over an indoor bin where it plumes back up. One old pillowcase handles a whole house of fans.
Wipe off the sticky film the pillowcase leaves behind
The pillowcase lifts the loose dust, but on most blades there is a second layer underneath: a thin, sticky film where dust bonded to airborne oils and humidity over months. You can feel it as a tacky, gray haze that a dry cloth just smears. For this, dampen a microfiber cloth with warm water and a single drop of dish soap, wring it until it is barely wet, and wipe each blade top and bottom. Support the blade with your other hand as you wipe so you do not bend it or stress the mounting screws, because fan blades flex more than they look like they will. Rinse or refold the cloth often so you are lifting the film off rather than spreading it. For blades that are only lightly hazed, the damp soapy cloth is all you need. Do not soak the blade or let water run toward the motor housing, and never use a dripping cloth overhead, both because water and electrical motors do not mix and because drips will streak your ceiling. If the blades are painted or have a wood veneer finish, keep the moisture minimal and dry them right after, since standing water can lift veneer and warp pressed wood blades over time. A barely damp wipe followed by a dry buff is the safe rhythm here.
For kitchen fans, cut the grease with a vinegar solution
Ceiling fans in or near a kitchen are a different job, because they pull in airborne cooking grease along with dust and end up with a genuinely sticky brown coating that plain soap struggles with. For these, mix a solution of equal parts white vinegar and warm water with a drop of dish soap, and use it on a well wrung microfiber cloth. The vinegar cuts the grease film the way it does on range hoods and backsplashes, and it is the same principle behind a lot of Dawn dish soap tricks for greasy kitchens. Wipe each blade, then go back over any spot that still feels tacky, giving the vinegar a minute to work rather than scrubbing hard. Greasy blades usually need two passes: one to break the film and one to wipe it clean. Dry each blade with a second cloth so you do not leave a vinegar haze that re attracts dust. Where this falls short is heavy, years old grease buildup that has essentially varnished onto the blade; for that you may need to take the blades off (usually a few screws each) and wash them flat in the sink with hot soapy water, which is worth it once but not something you do monthly. If you cook often, plan to wipe kitchen fan blades every few weeks so the grease never gets to that baked on stage.
Clean the light fixture, globes, and bulbs while you are up there
You are already on the ladder, so deal with the light kit now instead of making a second trip. Most fan light kits have glass globes or shades held by a few small thumbscrews or a threaded collar. Turn the light off and let hot bulbs cool first, then loosen the globes and bring them down. Dead bugs and dust collect inside globes and dim the light noticeably, so this one step genuinely brightens the room. Wash glass globes in warm soapy water in the sink, rinse, and dry fully before reinstalling, because a wet globe reinstalled over a warm bulb can spot or, on cheap glass, crack. Wipe the bulbs themselves with a dry microfiber cloth only when they are cool and off; dust on bulbs bakes on and cuts brightness. While the globes are down, wipe the light fixture base and the little chains and finials. Do not overtighten the globe thumbscrews when you put them back, since glass cracks easily under a hard turn; snug is enough. If a globe is cloudy with hard water spots from a previous wet wipe, a little white vinegar clears it, the same approach that works on hard water stains on glass and tile. Reinstall everything before you climb down so nothing is left loose overhead.
Do not forget the motor housing and pull chains
The blades get all the attention, but the motor housing and pull chains carry their own layer of dust and are quick to finish once the blades are done. Wipe the top and sides of the motor housing with a barely damp microfiber cloth, keeping moisture light because the housing has the wiring inside. Do not spray any cleaner directly onto or into the housing, ever; spray the cloth, not the fan. The decorative canopy where the fan meets the ceiling collects a surprising fur of dust on its upper curve, so wipe that too. For the pull chains, run a damp cloth down their length; the little dust that clings there transfers to your hand every time you turn the fan on or off. If a pull chain is greasy in a kitchen fan, the vinegar solution handles it. Check the blade mounting brackets as you go and confirm none of the screws have worked loose, because a loose blade arm is the most common cause of a wobbling fan, which I get to next. Keep all of this low moisture and low pressure; the housing is the one part of the fan you treat gently and never soak. A single wrung cloth is the right tool for the whole assembly.
Check for wobble and balance the blades if needed
Cleaning is a good moment to fix a wobble, since a shaking fan is not just annoying, it stresses the mount over time. First, with the fan off, gently push up on each blade and compare how far each one flexes and check that all the blades sit at the same slight angle; a bent blade or one seated unevenly throws the balance off. Wipe any remaining dust unevenly stuck to one blade, because even a lopsided dust load can cause a mild wobble, which is why a good cleaning sometimes fixes it on its own. Confirm every blade screw and every blade arm to motor screw is snug but not stripped. If it still wobbles after cleaning and tightening, most fans include a small balancing kit: a clip you move along a blade and stick on weights to counter the heavy blade. Clip the weight, run the fan, and adjust until the shake settles. Do not ignore a strong wobble; over months it loosens the ceiling mount and the electrical connections. Where DIY balancing does not help, the blades themselves may be warped from humidity, which happens to cheaper pressed wood blades, and replacing the blade set is the real fix. A well balanced fan also collects dust more evenly and runs quieter, so it is worth the five minutes.
Finish with a dryer sheet to slow the next dust buildup
Here is the maintenance trick that stretches the time between deep cleans. Once the blades are clean and dry, wipe the top of each blade with a dryer sheet or an anti static wipe. The anti static coating reduces the static charge on the blade surface that actively pulls dust out of the air and holds it, so the blades stay cleaner longer and the next wipe comes off easier. It is a small thing that genuinely works, and it costs almost nothing. Some people swear by a very light coat of furniture polish for the same anti static effect, but I prefer a dryer sheet because polish can build up into its own sticky film that grabs dust worse over time, the opposite of what you want. Do the tops of the blades, which face the ceiling and catch the most dust, and you do not need to bother with the bottoms. This is the same logic behind choosing paint and finishes that hide dust: you are not going to stop dust from existing, so you make surfaces that shed it or hide it. Redo the dryer sheet pass each time you clean and you will notice the blades take longer to build up that gray felt between cleanings.
Keep a duster handy for quick maintenance between deep cleans
The reason ceiling fans turn into such a dusty chore is that people only touch them twice a year, so the buildup is enormous each time. The fix is a two minute maintenance pass every couple of weeks with a long extendable duster, done from the floor with no ladder at all. A duster with a bendable head that wraps over the top of the blade grabs the light dust before it can compact into that sticky felt. Because you are catching it early, there is not enough dust to make a mess when it falls, and you may go months before you need the full pillowcase and cloth treatment again. This is especially worth doing on a fan you run daily and in bedrooms, where the dust you disturb ends up in the air you sleep in. Pair it with your other quick overhead tasks, wiping the AC vents and the tops of door frames, so the whole high dust layer of the room gets handled in one short lap. Keep the extendable duster somewhere easy to grab, because a tool you have to dig for is a tool you never use. Small and frequent beats big and dreaded with ceiling fans more than almost any other cleaning task.
What actually worked best and what I kept doing afterward
After cleaning a lot of fans, the routine I kept is simple: the pillowcase method for the deep clean, a barely damp soapy cloth for the film underneath, vinegar and water for anything in the kitchen, a dryer sheet to finish, and then a quick duster pass every couple of weeks so it never gets bad again. The pillowcase is the part I would never give up, because it turns the messiest overhead job in the house into something that leaves the floor clean. The dryer sheet finish surprised me with how much it slows the next buildup. What I stopped doing was waiting until the blades were visibly furry, because a heavy load is both a bigger mess and more likely to snow down while you work. I also stopped using furniture polish as a dust repellent after watching it build into its own grabby film. The honest reality is that a ceiling fan will always collect dust; you cannot prevent it, you can only make it fast to remove and slow to accumulate. Doing the light maintenance from the floor is what keeps it off the twice a year dread list. Treat the fan like the baseboards and vents, part of a quick high and low dusting lap, and it stays clean with almost no effort.
Mistakes that turn a five minute job into a dusty disaster
The biggest mistake is wiping the blades from below with an open cloth or a bare duster, which dumps the entire top layer of dust straight down onto your bed and furniture and into the air; the pillowcase exists specifically to prevent this, so use it. The second mistake is spraying cleaner directly on the fan, especially near the motor housing, since overspray can reach the wiring and the motor, and water and electricity are a genuine hazard, so always spray the cloth and never the fan. The third is using a dripping wet cloth overhead, which streaks the ceiling, risks drips into the motor, and can warp pressed wood blades; keep every cloth wrung to barely damp. Another common error is leaving the fan on the same switch as the light and having someone flip it on while your hand is up there, so kill the power and control the remote before you climb. People also overtighten glass globe screws and crack the glass, so keep those snug and no more. And do not skip the sturdy ladder in favor of balancing on a rolling chair or the arm of a couch; overhead work is exactly where a fall happens. Avoid these and the whole job stays quick, clean, and safe, which is the entire point of doing it the smart way.
Pro Tips
- ✓Keep one dedicated old pillowcase in your cleaning kit just for fan blades; a cotton case works better than a microfiber cloth here because it fully encloses the blade and traps the dust inside.
- ✓Clean fans on a day you are already dusting the room, and do the fan first, so any stray dust that escapes settles on surfaces you are about to wipe anyway.
- ✓Take a phone photo of the blade angle and any balancing weights before you remove or adjust anything, so you can put it all back exactly the same and avoid introducing a wobble.
- ✓Run the fan on low for a minute after cleaning to confirm it is balanced and quiet before you put the ladder away, so you are not climbing back up later.
- ✓For a fan you run every day, a two minute duster pass from the floor every couple of weeks means you almost never have to do the full ladder deep clean.
- ✓Reverse the fan direction seasonally while you are thinking about it; the switch on the motor housing is easy to reach when you already have the ladder out.
How we tested this guide
Every method in this deep clean guide was hands on tested by Fredler Pierre-Louis using An old cotton pillowcase (the single most useful tool here), Two microfiber cloths and A sturdy step stool or ladder, on the actual surface or material described and not on a staged photo set. We timed each of the 11 steps, recorded the dwell intervals, and noted where each one worked or fell short, then refined this 12 min guide based on what we observed across multiple test runs in real homes.
- Methods verified on the relevant surface or material before publication.
- Reviewed for chemical safety and surface compatibility before publication.
- Dwell times and proportions across all 11 steps match what actually works, not generic averages.
- Updated whenever a reader reports an edge case we missed.
Read our full editorial and testing policy or learn more about the team behind TryCleaningHacks.
Related Cleaning Guides
Safety Notes
- ⚠Always turn the fan off at the switch and secure the remote before you climb, and wait for the blades to stop completely; a coasting blade sits right at hand and head height on a ladder.
- ⚠Never spray cleaner directly onto or into the fan, especially the motor housing, which contains the wiring. Spray the cloth instead and keep all moisture light to avoid an electrical hazard.
- ⚠Use a sturdy, fully opened step stool or ladder placed directly under the fan. Do not balance on a rolling chair, a couch arm, or a wobbly stool for overhead work.
- ⚠Let light bulbs cool before touching them, and do not overtighten glass globes when reinstalling, because the glass cracks easily under a hard turn.
Frequently Asked Questions
What is the easiest way to clean ceiling fan blades without making a mess?
Slide an old cotton pillowcase over each blade like a sleeve, press the top and bottom against the blade, and pull it back toward you in one slow stroke. The dust is wiped off and captured inside the pillowcase instead of falling onto your bed and furniture. Then shake the pillowcase out outside or into the trash, never over an indoor bin. It is the single trick that turns fan cleaning from a dusty chore into a quick job.
How often should I clean my ceiling fan blades?
Do a proper wipe every couple of months, and a quick pass with an extendable duster every couple of weeks for a fan you run daily. The reason fans become such a mess is that people only clean them twice a year, so the dust compacts into a thick, sticky felt. Catching it early with a light duster pass keeps it from ever getting to that stage and means you rarely need the full ladder cleaning.
How do I get sticky grease off kitchen ceiling fan blades?
Cooking grease drifts up and bonds with dust into a tacky brown film that plain dusting cannot remove. Wipe the blades with a well wrung cloth dampened in equal parts white vinegar and warm water with a drop of dish soap, giving the vinegar a minute to break the grease, then wipe again and dry. Heavy, years old buildup may need the blades unscrewed and washed flat in hot soapy water once, after which regular wiping keeps it from returning.
Why does my ceiling fan wobble, and does cleaning help?
A wobble usually comes from an uneven dust load, a loose blade screw, or a warped blade. Cleaning the blades evenly and tightening every blade and blade arm screw fixes many wobbles on its own. If it still shakes, use the small balancing kit most fans include: clip the weight along a blade and adjust until the shake settles. A strong wobble is worth fixing because over time it loosens the ceiling mount and the wiring connections.
Can I use water to clean fan blades, or will it damage the fan?
A barely damp cloth is fine and often necessary for the sticky film, but never use a dripping cloth and never let water run toward the motor housing, which holds the wiring. Spray cleaner onto the cloth, not the fan. Painted or wood veneer blades in particular should get minimal moisture and be dried right after, because standing water can warp pressed wood blades and lift veneer over time.
How do I keep fan blades from getting dusty so fast?
After cleaning and drying the blades, wipe the tops with a dryer sheet or anti static wipe. The anti static coating reduces the static charge that pulls dust out of the air and holds it, so the blades stay cleaner longer and the next wipe comes off easier. Skip furniture polish for this, since it can build into its own sticky film that grabs dust worse. Redo the dryer sheet each time you clean.
You might also like

7 Deep Cleaning Tricks That Save Hours Every Week
I timed my bathroom the same way twice, once with my old habit of spray, wipe, repeat, and once with the batch method below. The old way took 45 minutes. The new way took 22. The single change that mattered most was almost embarrassingly simple, and I will tell you exactly what it was. None of this involves buying a gadget or a miracle spray. It is mostly about the order you do things in and where you stop wasting motion. I have cleaned the same rooms hundreds of times, made most of the mistakes, and kept only the moves that actually earned their place.
How to Deep Clean a Shower (10 Proven Methods)
I deep cleaned the same shower twice in one week once with my old routine and once with these ten methods applied in the right sequence. The difference wasn't even close. Here's what changed and the daily habit that eliminated most of my scrubbing for good.

30 Cleaning Myths You Need to Stop Believing
I believed most of these myths for years, and two of them left permanent marks on surfaces in my own house. This is the honest version of what I got wrong, why the popular advice fails, and the two safety myths that actually send people to the emergency room. I have kept the failures in here on purpose, because the mistakes taught me more than the wins did, and a myth is only dangerous while you still trust it.