
How to Clean an AC Vent So It Stops Spreading Dust and Bad Air Through the Whole House
I noticed a gray halo of dust forming on the ceiling around every supply vent in our house and a faint stale smell coming through the bedroom register every time the air conditioner kicked on. Both were the same problem: the vents and the air handler around them had not been cleaned in years, and the system was blowing the buildup straight into the room. Here is the safe step by step way to clean an AC vent properly, what to do about the duct beyond it, and the monthly habit that keeps the dust halo from ever coming back.
What You'll Need
Step-by-Step Instructions
Turn the system off at the thermostat before you touch a single vent
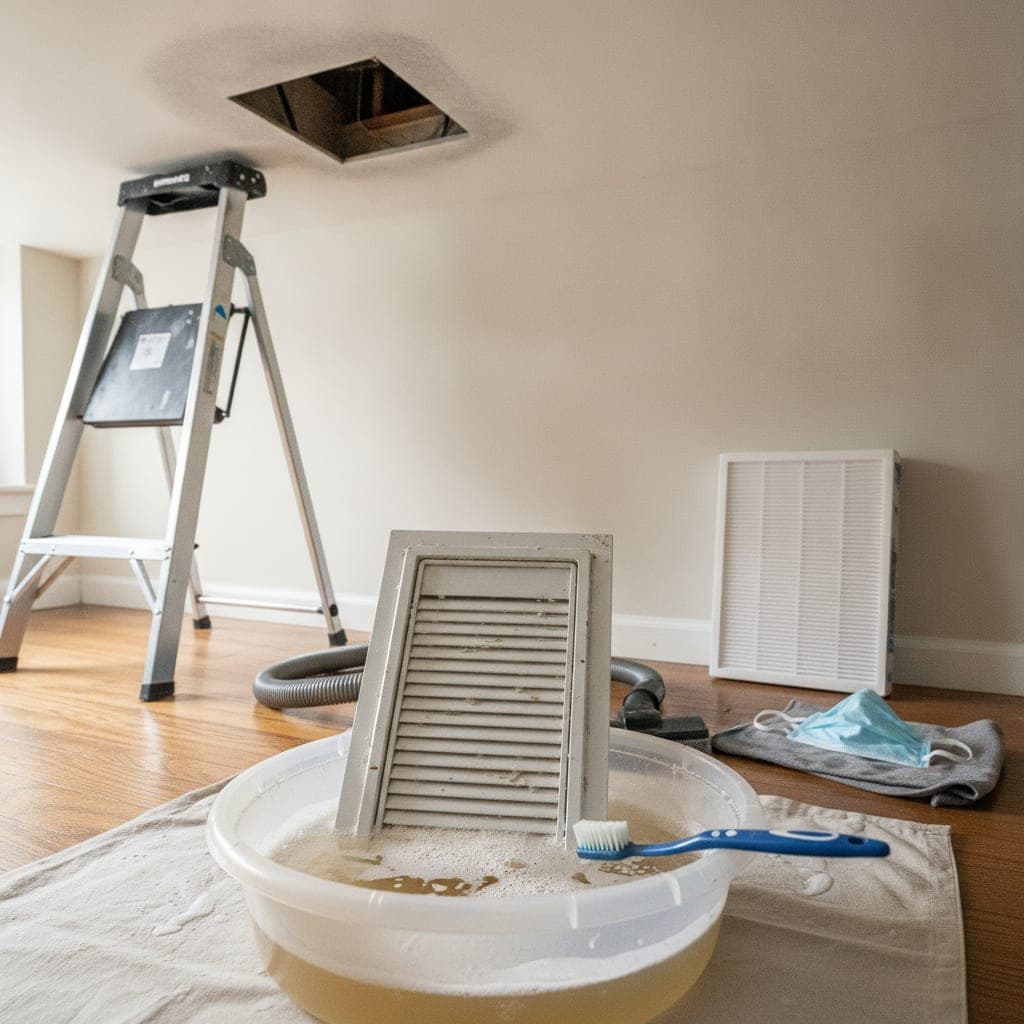
Before unscrewing any cover, switch the air conditioner and the furnace fan off at the thermostat, not just to the auto setting but fully off, because a system that kicks on while you are working blows years of accumulated dust directly into your face and pulls debris you are loosening straight back into the return duct, which only spreads the problem deeper into the system. Wait a couple of minutes after switching it off so any residual airflow stops completely. Put on a dust mask and safety glasses, because the dust around and inside a long uncleaned vent is far worse than ordinary household dust; it contains a packed mat of pet dander, lint, skin cells, mold spores from the cool damp interior of the ducts, and in older systems sometimes fiberglass particles from the duct lining. Inhaling a face full of that mat is unpleasant and avoidable, and a five dollar mask and a pair of safety glasses make the whole job tolerable. This is not optional safety gear for vent cleaning, it is the difference between feeling fine afterward and coughing for the rest of the day.
Pre-vacuum the visible vent cover and the area around it before you remove it
Before you touch the screws, vacuum the face of the vent cover and the wall or ceiling area around it with a brush attachment, because the loose dust sitting on the slats and the surrounding paint will dump onto your floor, your furniture, and your face the moment you wiggle the cover. Move slowly across each slat so the brush actually lifts the dust rather than just batting it around, and pay extra attention to the dust halo on the ceiling or wall, which is the visible record of years of dirty air being pushed through the slats and depositing fine particles along the airflow lines. A wide brush attachment is faster than a narrow one for the cover face itself. This pre-vacuum step is what stops the cleaning project from making a bigger mess than it solves, which is the most common reason people give up on vent cleaning halfway through. Skipping it is why dust halos often look worse before they look better the first time someone tries to clean a vent.
Unscrew and remove the vent cover, supporting it as the last screw comes out
Most supply and return vent covers are held in by two or four screws, usually a Phillips head, and they come off easily; the only trick is to support the cover with your free hand as you remove the final screw so it does not swing down or fall on you or the floor. Ceiling vents in particular can be heavy enough to bend the slats if they drop onto a hard floor, and a bent cover never sits flush again. Set the screws somewhere they cannot roll away, a small magnetic tray or the pocket of an apron, because dropping the screws into deep carpet or down a heating duct is a frequent and frustrating mistake. Once the cover is off, look briefly into the duct opening behind it with a flashlight but do not stick a vacuum hose deep into the duct; the goal of this job is to clean the vent cover itself and the area immediately around the boot or the duct opening, not to clean the full duct, which is a separate professional job we will address in a later step. Most of the dust you see and breathe comes from the cover and the first few inches of duct anyway.
Wash the vent cover in soapy water and let it dry fully before reinstalling
Take the vent cover to a utility sink or the bathtub, fill the basin with warm water and a few drops of mild dish soap, and let the cover soak for ten to fifteen minutes. The soak loosens the greasy dust film, especially on kitchen vents where cooking grease combines with airborne dust into a sticky coating that no amount of dry brushing removes. After the soak, scrub between every slat with an old toothbrush or a soft detail brush, because the dust between the slats is what restricts airflow and is the part you cannot reach while the cover is still installed. Rinse the cover under running water until the water runs clear and no soap remains, then dry it thoroughly with a microfiber cloth and stand it up to air dry for at least an hour, ideally longer, before reinstalling. Reinstalling a damp cover is what causes the small surface rust spots that develop along the edges of metal vent covers and the warping you sometimes see on plastic ones. While the cover is drying, work on the next step. For the same reason kitchen vent covers feel grimy, the 11 Dawn dish soap hacks for greasy kitchens guide covers cutting that sticky cooking grease film off other surfaces.
Vacuum and wipe just inside the duct opening that the cover came off of
With the cover off, use the soft brush attachment or the soft hose nozzle of your vacuum to clean the inside lip of the duct boot and gently reach in only as far as the vacuum head naturally extends, usually six to twelve inches. The goal here is the immediate area around the opening, where most of the loose dust that the system blows out has been collecting, not the deep interior of the duct. Aggressive vacuuming or pushing a long attachment deep into a duct can dislodge insulation, damage seals, or stir up far more dust than you can capture, which is why deep duct cleaning is a job for professionals with specialized equipment. After vacuuming, take a microfiber cloth dampened with a little warm soapy water and wipe the inside lip of the duct, the metal collar where the cover screws into, and the surrounding wall or ceiling area where the dust halo formed. Wipe gently and avoid soaking the cloth, because water dripping inside a duct is exactly what feeds mold growth in the metal. A barely damp cloth is the right amount of moisture. Finish by wiping the surrounding ceiling or wall with a clean dry microfiber to remove the dust halo, which lifts much more easily when paired with the duct work it came from.
Replace the actual air filter, the single most important step in the whole job
If you only do one thing in this entire guide, replace the system's air filter, because a clean filter is what keeps the vents and the ducts from getting dirty in the first place, and a dirty filter is the reason the dust is being blown out of the vents at all. Find the filter slot, which is usually on the air handler itself or behind a large dedicated return air grille in a hallway or central wall, slide out the old filter, and look at it: if it is gray, matted, and stiff rather than fluffy white, it should have been changed months ago, and it is the actual source of your dust problem. Buy the right size, the dimensions are printed on the edge of the old filter, and a basic pleated filter rated MERV 8 to MERV 11 is the right balance between filtration and airflow for most home systems. Higher MERV filters trap finer particles but restrict airflow more, which can strain older systems, so do not blindly buy the highest rating you see. Slide the new filter in with the airflow arrow pointing toward the air handler and write the install date on the edge of the filter with a marker so you have a clear record next time. Most filters need to be changed every one to three months depending on pets, allergies, and whether the system runs constantly.
Reinstall the dry vent cover and turn the system back on
Once the vent cover is completely dry, line it up so the slats angle the airflow the way you want it, downward and into the room rather than directly at a wall, and screw it back in, snug but not so tight that you crack the cover or strip the screw. Most covers have a clear right way up; if yours has angled slats that direct airflow, the slats should usually angle downward to push cool or warm air into the living space rather than straight up the wall. Turn the thermostat back on and stand under the vent for a minute as the system kicks on; the air should feel noticeably stronger and the slight dusty smell of the first few seconds should clear within a minute as the system cycles through the now-clean cover. If a strong dust smell continues for more than a few minutes, it usually means the filter you replaced was overdue by more than you realized, and the system is finally pulling settled dust through to be caught by the new filter, which is exactly what you want.
Know when the job is just vent cleaning and when you need professional duct cleaning
Vent cleaning and duct cleaning are two different jobs, and confusing them is why people either overspend on services they do not need or underclean a system that genuinely requires more. Cleaning the visible vent covers, the immediate area inside the duct opening, and the air filter is a DIY job that takes about thirty minutes per vent and addresses the dust most people actually see and breathe. Full duct cleaning, which involves running specialized vacuum equipment through the entire duct system, is genuinely worth paying for in specific cases: after a major home renovation that put drywall dust through the system, after evidence of mold growth inside the ducts (a persistent musty smell from multiple vents is a strong sign), after a pest infestation in the ducts, or in a newly purchased older home where you do not know the duct history. Outside those cases, the EPA notes that routine duct cleaning has not been shown to consistently improve indoor air quality, and the DIY vent and filter routine in this guide is what most homes actually need. Get duct cleaning when there is a clear specific reason, not as routine maintenance.
Set a realistic vent and filter rhythm so the dust halos never come back
Vents and filters need a rhythm rather than an occasional rescue clean. Change the air filter every one to three months, with one month being the right interval if you have pets, allergies, or run the system year round, and three months being the maximum for a quiet home with no pets. Vacuum the face of each vent cover with the brush attachment monthly while you are doing the rest of the dusting, which takes ten seconds per vent and prevents the dust halo from ever forming. Do the full take-off, wash, and wipe routine in this guide twice a year, in the spring before heavy AC use and in the fall before heavy heat use, which both opens up airflow before the season starts and catches mold or moisture issues before they get bigger. This combined rhythm, monthly quick vacuum, two annual full cleans, and consistent filter changes, keeps both the vent covers and the air coming out of them noticeably cleaner with very little ongoing work. Folding the filter change into the ultimate weekly cleaning schedule prevents it from being the one task that quietly gets forgotten until the system itself starts to suffer.
What actually fixed the dust halos and the stale smell
Three changes did almost all of the work in fixing the dust halo around every supply vent and the stale smell coming through the bedroom register. The first and most important was replacing the filter; the old one had been in for nearly a year and was gray and matted, and a fresh filter on its own noticeably reduced the volume of dust the system was depositing on the ceiling within a few days. The second was actually washing the vent covers in soapy water and scrubbing between every slat with a toothbrush, which removed the sticky greasy film that dry vacuuming alone never touched and that was the real reason the slats looked permanently dusty no matter how often I wiped them. The third was wiping the inside lip of the duct opening and the dust halo on the ceiling around it, which lifted the visible discoloration that I had assumed needed repainting. The stale smell from the bedroom vent turned out to be the cover itself, not the duct; once it was washed and dried fully, the smell was gone, and it has not returned in the months since. If you do only one thing, replace the air filter and write the date on it; that single change is what permanently slows the rate at which everything else gets dirty.
Mistakes that make a vent cleaning worse than no cleaning at all
Mistake one: leaving the system running while you work. The blower pulls dust straight into the return ducts and blows what you are loosening back out other vents, which spreads the mess to rooms you were not even cleaning. Turn the thermostat fully off at the start and back on only when the cover is reinstalled and dry. Mistake two: skipping the dust mask. The dust in a long uncleaned vent contains years of accumulated dander, lint, mold spores, and sometimes fiberglass; a face full of it triggers respiratory issues that take days to clear, and a five dollar mask prevents the whole problem. Mistake three: pushing a vacuum hose or a brush deep into the duct. Aggressive DIY duct cleaning dislodges insulation, damages seals, and stirs up far more dust than you can capture, which is why the deep duct is a professional job; stay within six to twelve inches of the opening. Mistake four: reinstalling a damp vent cover. Water trapped behind a freshly screwed-on cover causes the rust spots and warping you see on older covers and seeds mold in the duct boot; let the cover dry fully, an hour minimum, before reinstalling. Mistake five: cleaning the vents and not changing the filter. A spotless vent cover with a saturated filter behind it gets re-dirty within weeks, because the filter is the actual gatekeeper for everything the system breathes in. The filter change is the part that makes the rest of the cleaning last.
Pro Tips
- ✓Turn the system fully off at the thermostat before unscrewing a single vent. A blower that kicks on mid clean blows years of dust straight into your face and into other rooms.
- ✓Wash the vent cover in soapy water and scrub between every slat with an old toothbrush. The sticky film between the slats is the real reason they look permanently dusty.
- ✓Replace the air filter and write the install date on the edge. A clean filter is what keeps the vents and ducts from getting dirty in the first place.
How we tested this guide
Every method on this page was hands on tested by Fredler Pierre-Louis on the actual surface or material described, not on a staged photo set. We recorded the timing, the dwell intervals, and the conditions where each method worked or fell short, then refined the steps based on what we observed across multiple test runs in real homes.
- Methods verified on the relevant surface or material before publication.
- Reviewed for chemical safety and surface compatibility before publication.
- Dwell times and proportions match what actually works, not generic averages.
- Updated whenever a reader reports an edge case we missed.
Read our full editorial and testing policy or learn more about the team behind TryCleaningHacks.
Related Cleaning Guides
Safety Notes
- ⚠Always wear a dust mask and safety glasses when cleaning a long-neglected vent. The packed dust mat inside can contain pet dander, mold spores, and fiberglass particles you do not want to inhale.
- ⚠Use a sturdy step ladder for ceiling vents rather than standing on a chair or stack of bins. Ceiling vent falls are a common DIY injury.
- ⚠Do not push a vacuum hose or brush deep into the duct beyond the immediate opening. Aggressive DIY duct cleaning damages seals and insulation and is a job for professionals with specialized equipment.
Frequently Asked Questions
How do I clean an AC vent without damaging it?
Turn the system fully off at the thermostat, put on a dust mask and safety glasses, and vacuum the face of the vent cover with a brush attachment before removing any screws. Unscrew the cover supporting it with your free hand, soak it in warm soapy water for ten to fifteen minutes, scrub between the slats with an old toothbrush, rinse, and dry it completely before reinstalling. While the cover is off, gently vacuum the inside lip of the duct opening with a soft brush attachment, but do not push deep into the duct, which is a job for professionals. Letting the cover air dry fully before reinstalling prevents the rust spots and warping common on older covers.
How often should I clean my AC vents?
Vacuum the face of each vent cover with a brush attachment monthly while you are doing the rest of the household dusting; it takes about ten seconds per vent and prevents the dust halo on the ceiling around the vent from ever forming. Do the full take-off, wash, and wipe routine twice a year, in the spring before heavy AC use and in the fall before heavy heat use. Change the actual air filter on the system every one to three months, with one month being right for homes with pets or allergies, three months being the maximum for a quiet home. The filter change is the most important single task because it is what keeps the vents from getting dirty in the first place.
Do I need professional duct cleaning?
Not for routine maintenance. The EPA notes that routine duct cleaning has not been shown to consistently improve indoor air quality, and cleaning the visible vent covers and changing the filter is what addresses the dust most people actually see and breathe. Professional duct cleaning is worth paying for in specific cases: after a major home renovation that put drywall dust through the system, after evidence of mold growth inside the ducts (a persistent musty smell from multiple vents is a strong sign), after a pest infestation, or in an older home where you do not know the duct history. Get duct cleaning when there is a clear specific reason, not as routine maintenance.
Why is there a gray dust halo around my AC vents?
The gray halo on the ceiling or wall around a vent is the visible record of years of dirty air being pushed through the slats and depositing fine particles along the airflow lines. The real cause is almost always an overdue air filter, which lets dust pass through the system to be deposited at every supply vent. Replace the filter first, then clean the vent cover and wipe the halo off the ceiling. The halo will not return as long as the filter is changed on schedule, which is the simplest fix and the one most people skip when they only focus on cleaning the vent itself.
You might also like

7 Deep Cleaning Tricks That Save Hours Every Week
After timing the same bathroom clean twice once with my old routine and once using these tricks the second run took 22 minutes to the first run's 45. Here's what made the biggest difference and the one mistake I see in almost every cleaning routine.
How to Deep Clean a Shower (10 Proven Methods)
I deep cleaned the same shower twice in one week once with my old routine and once with these ten methods applied in the right sequence. The difference wasn't even close. Here's what changed and the daily habit that eliminated most of my scrubbing for good.
30 Cleaning Myths You Need to Stop Believing
I've been on the wrong side of most of these myths. Bleach-over-grease, newspaper on mirrors, vinegar on marble all things I did before understanding why they don't work or actively cause damage. Here's what actually changed how I clean and the two safety myths that matter most.