How to Clean a Microfiber Couch, Including the Water Stain Rings
Microfiber couches look great until they get a water ring or a set in stain, and cleaning them the wrong way leaves permanent marks. Here is how to read the cleaning code, use rubbing alcohol the right way on S coded suede microfiber, and fix those water stains that make people panic.
Jump to a section
- What you'll need
- Step-by-step
- Find the cleaning code tag before you touch it with anything
- Vacuum the whole couch thoroughly first
- For S coded microfiber, clean with rubbing alcohol
- Brush the nap back to life once it dries
- Fix water stains and rings the counterintuitive way
- Pretreat grease and oil stains before the main clean
- Pro tips
- FAQ
What You'll Need
Step-by-Step Instructions
Find the cleaning code tag before you touch it with anything
Every upholstered couch has a small fabric care tag, usually under a cushion or on the frame beneath the seat, and reading it is the step that decides whether you clean your couch or ruin it. There are four codes. W means you can use a water based cleaner. S means solvent only, so water will leave rings and you clean it with a solvent like rubbing alcohol. W/S means either water or solvent is fine. X means vacuum only, and any liquid cleaner will damage it, so those go to a professional. Most of the soft suede like microfiber couches people struggle with are coded S, which is exactly why water leaves those maddening rings, the fabric is not meant to get wet. Find your tag and read the letter before you do anything else, because the whole method changes based on it. If the tag is missing or unreadable, treat the couch as S and test on a hidden spot first, since the solvent method is the safer default for microfiber and does not leave water marks. Do not assume; a W method on an S fabric is how you get the blotchy water stained couch that sends people searching for help in the first place. Thirty seconds of finding the tag saves you from a permanent mistake.
Vacuum the whole couch thoroughly first
Before any cleaner, vacuum the entire couch with the upholstery attachment. Microfiber is a magnet for dust, crumbs, pet hair, and the fine grit that works its way into the nap, and if you start rubbing cleaner in over that grit you just grind it deeper and can scratch and mat the fibers. Take the cushions off and vacuum both sides, get into the seams and crevices where crumbs and change collect, and run the attachment along the arms and back. Use the crevice tool down the sides of the seat deck where the worst debris hides. For stuck on pet hair that the vacuum will not lift, a rubber glove or a slightly damp rubber squeegee dragged across the fabric balls the hair up so you can grab it, the same trick that works for pet hair and stains on carpet. Getting the couch fully vacuumed first means the cleaning step actually works on stains and grime rather than pushing loose dirt around, and it prevents the muddy smear you get when liquid meets a layer of dust. This is also your chance to notice which spots need targeted stain treatment versus a general clean. A well vacuumed microfiber couch sometimes looks so much better that you realize most of what dulled it was just surface dust and hair, not a stain at all.
For S coded microfiber, clean with rubbing alcohol
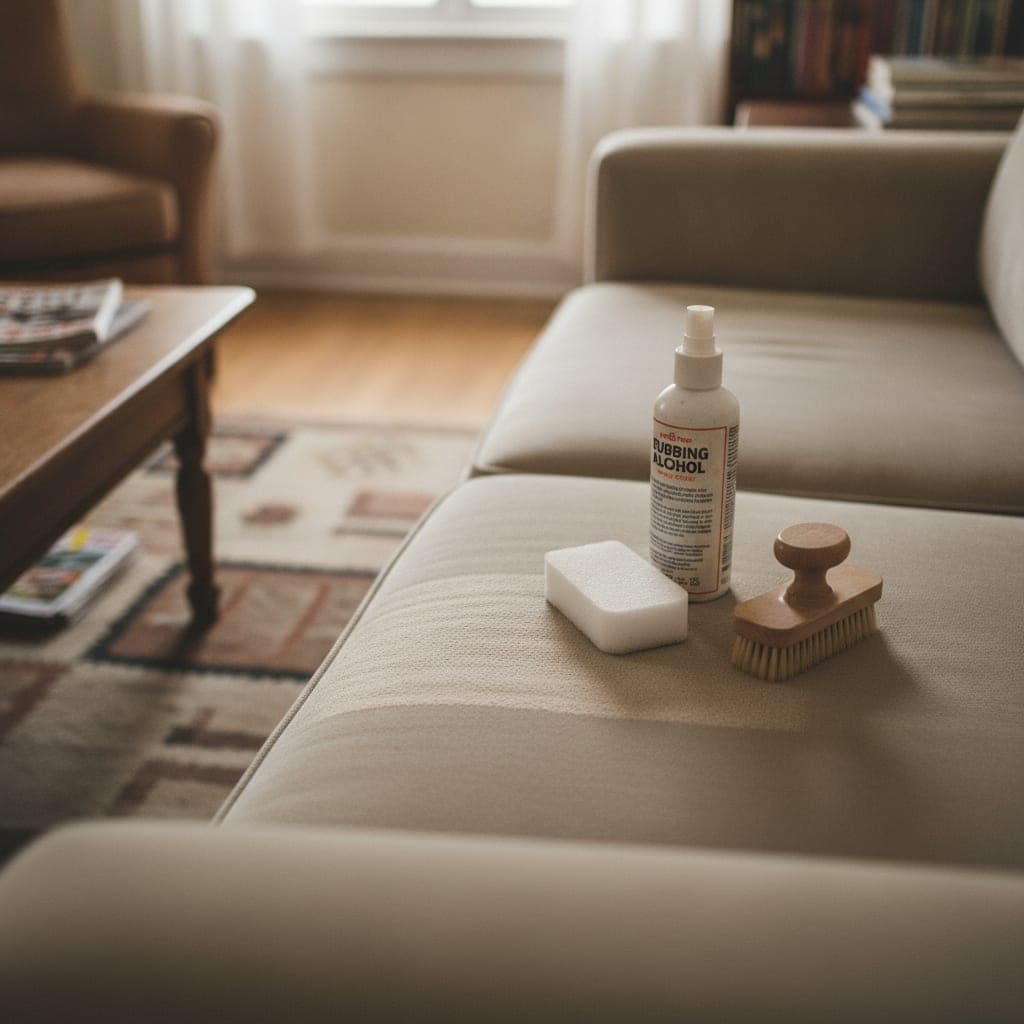
This is the method for the common suede like microfiber, and it works almost like magic when you do it right. Fill a spray bottle with rubbing alcohol (isopropyl), mist a section of the couch until the fabric is damp but not soaked, and immediately rub it with a white or natural colored sponge. The alcohol lifts the dirt and, crucially, it evaporates fast and cleanly, so it does not leave the water rings that plain water leaves on S fabric. This is one of the most useful rubbing alcohol cleaning tricks there is. Work in sections roughly a cushion at a time so you can keep track and blend the edges. The reason to use a white or natural sponge is important: a colored sponge can bleed its own dye into the damp fabric and leave a worse stain than the one you started with, so never use a bright yellow or green sponge here. Spray, rub, and the grime transfers to the sponge; rinse or flip the sponge as it darkens. Because the alcohol dries quickly, you can see your progress in a minute or two rather than waiting for water to dry. Do the whole couch, not just the dirty patch, so you do not end up with one suspiciously clean cushion next to dingy ones. Keep the room ventilated while you work, since alcohol fumes are strong.
Brush the nap back to life once it dries
Here is the step that makes an alcohol cleaned microfiber couch look genuinely restored instead of just clean: brushing. As the alcohol dries, the microfiber nap often looks stiff, matted, or darker in the cleaned area, and people panic thinking they damaged it. You did not. Once the section is fully dry, take a soft bristle brush, a clean nail brush or a soft scrub brush works well, and brush the fabric in small circles or back and forth. This fluffs the flattened fibers back up and blends the texture and color so the cleaned area matches the rest of the couch. The transformation is dramatic; a patch that looked stiff and blotchy while wet comes back to an even, soft nap after a good brushing. Always let the fabric dry before you judge the result or the texture, because wet microfiber always looks worse than it will end up. If a section still looks slightly matted after brushing, a second pass with the dry brush usually evens it out. This dry brushing is also why the alcohol method beats water on this fabric: you get a fast drying clean and a simple way to reset the nap. Make brushing the standard finish to every section you clean and the whole couch ends up with a uniform, refreshed surface rather than clean but crunchy patches.
Fix water stains and rings the counterintuitive way
Water rings on microfiber send people into a panic, and the fix is the opposite of what instinct says. A water stain is not really dirt; it is a ring left where a small amount of water dried unevenly and pulled the fabric minerals and residue to the edge, leaving a darker outline. You do not remove it by dabbing at the ring, which only makes a smaller ring. Instead you re wet the whole area evenly and let it dry uniformly so there is no edge to form a ring. On S coded microfiber, spray the entire panel or cushion evenly with rubbing alcohol (or lightly mist with distilled water if the ring is stubborn and the fabric tolerates it), covering past the edges of the stain, then rub with the white sponge and let it dry evenly, and brush the nap when dry. Because you treated the whole section rather than just the spot, there is no partial wet edge to leave a new ring. Distilled water matters if you use water at all, because tap water minerals are part of what creates the ring in the first place. This even out the whole panel approach is the real secret to microfiber water stains, and it is why cleaning one small spot always seems to just move the ring around. Treat the full cushion, dry it evenly, brush, and the ring disappears.
Pretreat grease and oil stains before the main clean
Grease and oil stains, from food, hands, or hair products on the headrest area, need a first step before the alcohol or soap, because solvent alone smears oil around. Sprinkle a generous layer of baking soda (or cornstarch) directly onto the fresh or old grease spot and let it sit for fifteen minutes to several hours; the powder absorbs the oil out of the fibers. This is the same absorbing power behind a lot of baking soda cleaning uses. Then vacuum the powder away, and you will often see the stain is already much lighter because the oil came up with the baking soda. Now clean the spot with your fabric appropriate method, alcohol for S, or dish soap solution for W. For the greasy sheen that builds up on the headrest and arms from skin oils over time, the baking soda pretreat followed by an alcohol clean and a brush is the combination that actually cuts it. Do not rub oil stains hard before absorbing them, because that just spreads the oil into a bigger patch and pushes it deeper. Absorb first, then clean. For a truly set in old grease mark, you may need to repeat the baking soda absorption a second time; it is slow but it lifts far more oil than jumping straight to a liquid cleaner ever will.
For W coded fabric, use a gentle dish soap foam
If your tag reads W or W/S, you have more options, and a gentle soapy foam is the go to for general grime. Mix a few drops of mild dish soap into warm water and whip or agitate it until you have a bowl of suds, then apply mostly the foam, not the liquid, to the fabric with a sponge or soft cloth. Using the suds rather than soaking the fabric keeps the material from getting overly wet, which is what causes long drying times and, on some fabrics, its own faint water marks. Work the foam into the soiled areas, then blot with a clean damp cloth to lift the loosened dirt, and blot again with a dry cloth to pull out moisture. Work section by section and blend the edges so you do not leave a clean island. For W/S fabric with a greasy or ground in stain, you can still reach for rubbing alcohol on the tough spots, since the S option is on the table too. Let W cleaned fabric air dry fully, and a fan speeds it and helps prevent any residual mark. Even on water safe fabric, the rule is less water than you think; a light foam and thorough blotting beats a soaked cushion that stays damp for a day and can develop mildew inside the foam.
Deodorize the cushions with baking soda
Couches absorb odors, sweat, pets, food, and cleaning alone does not always pull the smell out of the foam, so a deodorizing step is worth adding. Once the couch is clean and fully dry, sprinkle a light, even layer of baking soda over the cushions and the seat deck and let it sit for at least fifteen minutes, or a few hours for stronger odors, then vacuum it all up with the upholstery attachment. Baking soda absorbs odors rather than masking them, which is why it works on couches the same way it works on mattresses and carpets. For a couch that holds a lot of smell, this is genuinely more effective than any spray, and you can pair it with the same odor approach used to deep clean a mattress. Make sure the fabric is completely dry before you apply the baking soda, because sprinkling it on damp microfiber turns it into a paste that is a nuisance to vacuum out. Vacuum thoroughly afterward so no powder residue is left in the seams. If odors are coming from the cushion foam itself rather than the surface, unzip the covers if they come off and air the foam out separately, since surface deodorizing cannot fully reach smells trapped deep in the foam. For everyday freshening, a monthly baking soda and vacuum keeps a well used couch from developing that settled in smell.
What actually worked best and what I kept doing afterward
The routine I kept for microfiber is straightforward once you know the fabric code: read the tag, vacuum thoroughly, clean S fabric with rubbing alcohol and a white sponge, and always finish by brushing the dry nap back to life. The brushing is the step people leave out, and it is the one that takes a couch from clean but crunchy to actually restored. For water rings, treating the whole panel and drying it evenly, instead of dabbing at the spot, is the fix that finally made them disappear for me rather than just relocating. The baking soda pretreat for grease and the baking soda deodorize for smell are both worth the extra time on a well used couch. What I stopped doing was using plain water or a colored sponge on S coded microfiber, since water leaves rings on that fabric and a dyed sponge can bleed color into it. The honest limit is that some stains, old set in ones, dye transfer from dark clothing, or ground in body oil, may only lighten rather than vanish, and a truly damaged or X coded couch belongs with a professional. But for routine grime and the dreaded water rings, the alcohol, sponge, and brush method is reliable, cheap, and fast, and it is what I reach for every time.
Mistakes that leave a microfiber couch worse than before
The number one mistake is using water on an S coded fabric, which is what creates the water rings people are trying to fix in the first place; read the tag and use rubbing alcohol on S microfiber instead. The second is using a brightly colored sponge or cloth, which can bleed its dye into the damp fabric and leave a stain worse than the original, so always use a white or natural sponge. The third is treating only a small spot instead of the whole cushion or panel, which leaves either a suspiciously clean patch or a fresh water ring at the wet edge; feather your cleaning across the full section and dry it evenly. People also skip the vacuum step and grind surface grit into the nap, and they skip the final dry brushing and end up thinking they ruined the texture when the fabric was just still flattened from being wet. Rubbing oil stains hard before absorbing them with baking soda spreads the grease into a bigger mark, so absorb first. And soaking the couch, on any fabric code, leads to long drying times and mildew risk inside the foam, so use the least moisture that works. Avoid these and microfiber is one of the more forgiving fabrics to clean; ignore them and it is one of the easiest to permanently mark.
Pro Tips
- ✓If the care tag is missing or unreadable, treat the couch as S coded and use rubbing alcohol, since it cleans microfiber well and does not leave the water rings that plain water can.
- ✓Always test any cleaner on a hidden area first, like the back corner or under a cushion, and let it dry fully before you judge it, because microfiber always looks worse while wet.
- ✓Keep a dedicated soft brush with your supplies just for fluffing the nap after cleaning; brushing the dry fabric is what makes the cleaned area blend back in.
- ✓Clean a whole cushion or panel at a time rather than spot cleaning, so you never leave a clean island or a wet edge that dries into a new ring.
- ✓Use distilled water, not tap water, any time water touches the fabric, because tap water minerals are part of what forms those stubborn rings.
- ✓Blot spills immediately with a dry white cloth before they soak in; catching a spill in the first minute is the difference between a wipe and a set in stain.
How we tested this guide
Every method in this deep clean guide was hands on tested by Fredler Pierre-Louis using Rubbing alcohol (isopropyl) in a spray bottle, for S coded microfiber, A white or natural colored sponge (never a dyed one) and A soft bristle brush, like a clean nail brush or a soft scrub brush, on the actual surface or material described and not on a staged photo set. We timed each of the 10 steps, recorded the dwell intervals, and noted where each one worked or fell short, then refined this 14 min guide based on what we observed across multiple test runs in real homes.
- Methods verified on the relevant surface or material before publication.
- Reviewed for chemical safety and surface compatibility before publication.
- Dwell times and proportions across all 10 steps match what actually works, not generic averages.
- Updated whenever a reader reports an edge case we missed.
Read our full editorial and testing policy or learn more about the team behind TryCleaningHacks.
Related Cleaning Guides
Safety Notes
- ⚠Rubbing alcohol is flammable. Work in a well ventilated room, keep it away from open flames, stoves, and cigarettes, and do not use it near any heat source or while anything is burning.
- ⚠Never use a brightly colored or dyed sponge or cloth on damp microfiber, because the dye can transfer into the fabric and leave a stain that is harder to remove than the original.
- ⚠Do not over wet any upholstery. Soaking the cushions leads to very long drying times and can grow mildew inside the foam, which causes odors you cannot clean from the surface.
- ⚠Follow the fabric care code. Using a water based cleaner on an S or X coded couch can permanently stain or damage it, so read the tag and match your method to it.
Frequently Asked Questions
How do I clean a microfiber couch that is coded S?
S means solvent only, so use rubbing alcohol, not water. Mist a section with isopropyl alcohol from a spray bottle until damp, rub with a white or natural colored sponge to lift the dirt, and let it dry; the alcohol evaporates fast and does not leave water rings. Once dry, brush the nap with a soft brush to fluff it back up and blend the texture. Work one cushion at a time, keep the room ventilated, and never use a colored sponge that could bleed dye into the fabric.
How do I get water stains and rings out of a microfiber couch?
Water rings form when a small amount of water dries unevenly and pulls residue to the edge. The fix is to re wet the entire panel evenly rather than dabbing the spot. On S coded microfiber, spray the whole cushion evenly with rubbing alcohol (or lightly with distilled water), rub with a white sponge, let it dry uniformly with no wet edge, and brush the nap when dry. Because you treated the full section instead of just the ring, there is no partial wet line to leave a new mark.
Why did my microfiber couch get stiff and darker after I cleaned it?
That is normal and temporary. Microfiber nap looks matted, stiff, and darker while it is damp, which makes people think they damaged it. Let the area dry completely, then brush it with a soft bristle brush in small circles to fluff the fibers back up. The texture and color even out and blend with the rest of the couch. Always wait for the fabric to dry and brush it before judging the result, because wet microfiber always looks worse than the finished, brushed surface.
Can I use dish soap and water on a microfiber couch?
Only if the care tag reads W or W/S. On those fabrics, whip mild dish soap into warm water and apply mostly the foam, not the liquid, then blot with a damp cloth and a dry cloth, working section by section. If the tag reads S, water will leave rings, so use rubbing alcohol instead. If it reads X, use no liquid at all and vacuum only or call a professional. Reading the code first is what keeps you from permanently staining the couch.
How do I get grease or body oil stains off microfiber?
Absorb the oil before you apply any liquid cleaner. Sprinkle baking soda or cornstarch generously on the grease spot and let it sit fifteen minutes to a few hours, then vacuum it up; the powder pulls the oil out of the fibers. Then clean the spot with your fabric appropriate method, alcohol for S or dish soap foam for W, and brush the nap. Do not rub oil hard before absorbing it, since that just spreads the grease into a larger, deeper stain.
How do I get rid of odors in a microfiber couch?
Once the couch is clean and fully dry, sprinkle a light, even layer of baking soda over the cushions and seat deck, let it sit at least fifteen minutes or a few hours for strong odors, then vacuum it up thoroughly. Baking soda absorbs smells rather than masking them. Make sure the fabric is dry first so the powder does not clump. If the odor is deep in the foam rather than on the surface, air the cushions out separately, since surface deodorizing cannot fully reach smells trapped inside the foam.
You might also like
7 Deep Cleaning Tricks That Save Hours Every Week
I timed my bathroom the same way twice, once with my old habit of spray, wipe, repeat, and once with the batch method below. The old way took 45 minutes. The new way took 22. The single change that mattered most was almost embarrassingly simple, and I will tell you exactly what it was. None of this involves buying a gadget or a miracle spray. It is mostly about the order you do things in and where you stop wasting motion. I have cleaned the same rooms hundreds of times, made most of the mistakes, and kept only the moves that actually earned their place.
How to Deep Clean a Shower (10 Proven Methods)
I deep cleaned the same shower twice in one week once with my old routine and once with these ten methods applied in the right sequence. The difference wasn't even close. Here's what changed and the daily habit that eliminated most of my scrubbing for good.
30 Cleaning Myths You Need to Stop Believing
I believed most of these myths for years, and two of them left permanent marks on surfaces in my own house. This is the honest version of what I got wrong, why the popular advice fails, and the two safety myths that actually send people to the emergency room. I have kept the failures in here on purpose, because the mistakes taught me more than the wins did, and a myth is only dangerous while you still trust it.