
How to Deep Clean a Plunger
A plunger is the one tool in the bathroom that handles the dirtiest job in the house and almost never gets cleaned itself. After timing this routine on a real plunger that had been used four times since the last cleaning, here is the order that actually sanitizes both the cup and the handle without splashing and the mistakes that just move bacteria around.
Jump to a section
- What you'll need
- Step-by-step
- Put on gloves before you touch anything
- Flush the toilet, then plunge it three times in clean water
- Mix a bleach solution in a five-gallon bucket using one cup of bleach per gallon of hot water
- Submerge the plunger cup-down for fifteen minutes
- Scrub the inside and outside of the cup with a stiff nylon brush while it is still in the bucket
- Rinse the plunger under hot running water for at least sixty seconds
- Pro tips
- FAQ
What You'll Need
Step-by-Step Instructions
Put on gloves before you touch anything
Disposable rubber gloves are non-negotiable for this entire job. The plunger cup, the handle, and the holder underneath all carry bacteria from previous uses, and any nick on a hand creates an entry point for fecal bacteria including E. coli and norovirus, both of which survive on rubber surfaces for hours and on plastic surfaces for days. Use single-use nitrile or latex gloves rather than reusable cleaning gloves, because the gloves are going in the trash at the end of this job along with the contaminated paper towels and old toothbrush. Reusable gloves trap moisture against the inside surface of the glove and become a contamination source themselves over time, especially when stored damp under a sink. If you do not own disposable gloves, this is a job worth waiting until you do rather than improvising with reusable gloves or, worse, bare hands. While you are at it, change into a shirt you do not mind getting bleach splashes on. Concentrated bleach will leave permanent white spots on any colored fabric within seconds of contact, and a single splash from the bucket onto a sleeve is more than enough to ruin the shirt. Tie back long hair so it does not fall forward into the bucket while you are scrubbing.
Flush the toilet, then plunge it three times in clean water
Before any cleaning, flush the toilet so the bowl water is as clean as it gets, then plunge three times to rinse the cup of the plunger in that comparatively clean water. This pre-rinse removes the heaviest visible debris before the plunger ever leaves the bathroom and turns what would otherwise be a high-contamination object into a moderately-soiled one before any further handling. Skipping this step means you carry that debris through the house to the laundry sink or wherever else you plan to clean the plunger, which defeats the entire point of cleaning it and contaminates the path you walked. After the third plunge, hold the plunger above the bowl for thirty seconds to let the water drain back into the toilet rather than dripping across the floor as you walk to the bucket. Flush one more time before lifting the plunger out of the bowl entirely. The cleaner the starting condition of the plunger, the more effective the bleach soak that follows, because the bleach concentration is depleted by every gram of organic matter it has to react with.
Mix a bleach solution in a five-gallon bucket using one cup of bleach per gallon of hot water
Set a five-gallon bucket in the bathtub or, ideally, the laundry-room utility sink. The utility sink is the better location because any accidental splash drains directly out instead of pooling in the tub where it has to be wiped down later. Add three gallons of hot tap water first, then pour in three cups of standard household bleach. Always add the water to the bucket before the bleach, never bleach first followed by water, because the splash from pouring water into a bucket of concentrated bleach can launch droplets into the eyes or onto skin. The ratio of one cup of bleach per gallon of water is well above the standard sanitizing concentration recommended by the EPA, and is appropriate here because the plunger surface is heavily contaminated with fecal bacteria, viruses, and biofilm that has had time to harden. Stir gently with the plunger handle so you do not splash the solution against the bucket walls. Do this with the bathroom door open and a window cracked, because the bleach vapor combined with the hot water rises quickly and can saturate a small bathroom in under five minutes to a level that causes coughing and watery eyes. Run the bathroom exhaust fan throughout the entire job. Never substitute ammonia-based cleaner for bleach in this step. The combination produces toxic chloramine gas that can cause permanent respiratory injury within minutes of inhalation. For a broader bathroom sanitizing routine that pairs with this one, the order in our 15 bathroom deep clean hacks for hotel-level shine covers the surrounding fixtures.
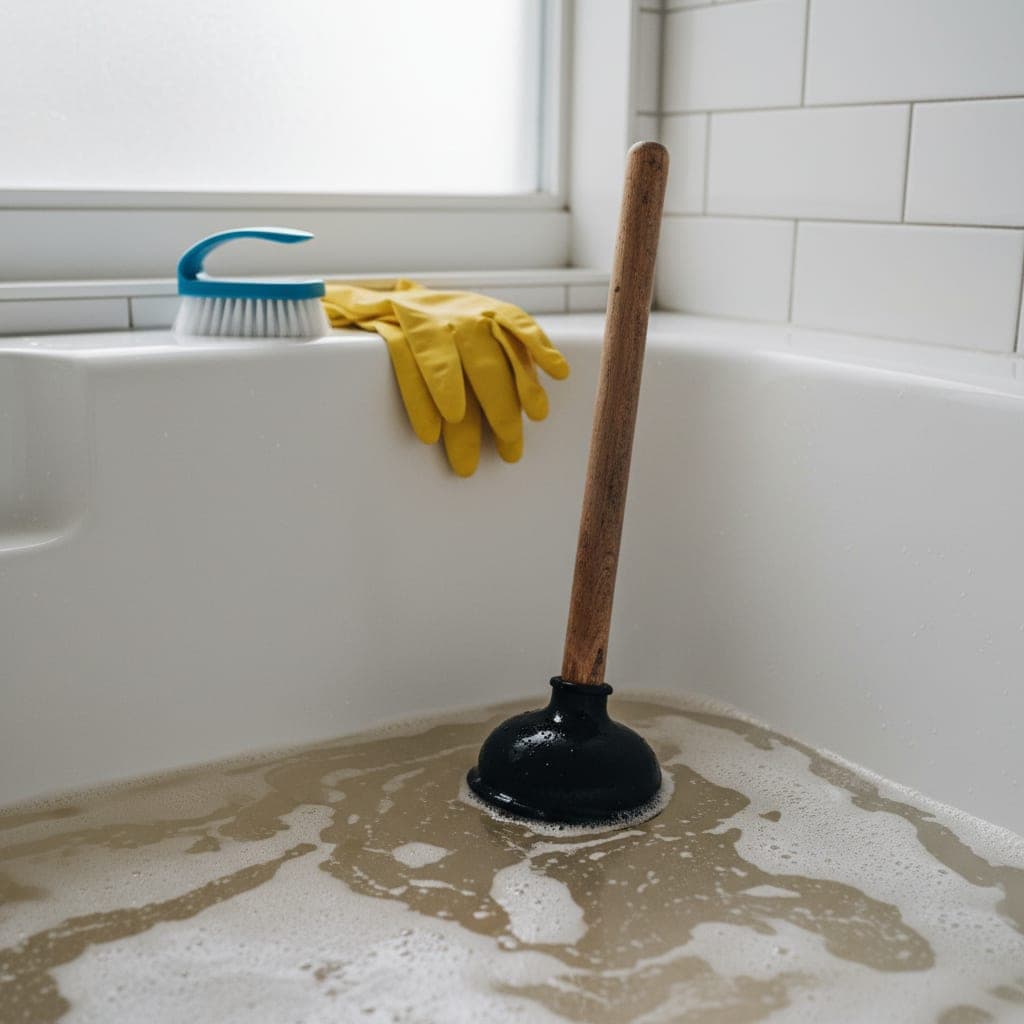
Submerge the plunger cup-down for fifteen minutes
Lower the plunger into the bucket cup-first so the rubber cup is fully submerged in the bleach solution. Push the handle down slightly to displace any trapped air pocket inside the cup, then release the pressure so the cup fills completely with bleach solution rather than holding an air bubble that prevents contact with the inside surface. The trapped-air problem is the single most common reason a plunger soak fails to fully sanitize the cup interior. The bleach needs a minimum of ten minutes of contact time to inactivate bacteria and viruses on a heavily contaminated surface according to standard CDC sanitation guidance, but ten minutes is the bare floor and assumes a relatively clean starting surface. Fifteen minutes is a safer target for a plunger, and twenty minutes is appropriate for one that has been used on a particularly heavy clog. Set a phone timer rather than guessing, because two or three minutes shy of the contact time leaves the inside of the cup still contaminated even though the surface looks visually clean. During the soak, keep the bathroom exhaust fan running and avoid leaning over the bucket. The hot bleach solution releases the most vapor in the first ten minutes as it cools.
Scrub the inside and outside of the cup with a stiff nylon brush while it is still in the bucket
After the soak, hold the plunger handle and scrub the inside of the cup with a dedicated stiff-bristle nylon brush, then scrub the outside, the rim, and the seam where the cup meets the handle. Use firm overlapping strokes rather than light passes, because biofilm in the deepest folds of a used plunger cup is physically tough and requires mechanical action in addition to the chemical contact time. The bleach softens the biofilm during the soak; the brush is what actually removes it. Keep the cup submerged while scrubbing so any debris that comes loose stays in the bleach solution rather than splashing on the rim of the bucket or onto the floor where it would have to be cleaned a second time. Pay particular attention to the inner curve of the cup where the rubber bends inward at the rim, because that fold collects more debris than any other single spot on the plunger and is the hardest to reach with any other tool. This brush is now contaminated and should be reserved for plunger duty only, labeled with a permanent marker, and stored separately from any brush used on cookware, food surfaces, or general household cleaning. Cross-contamination of cleaning brushes is one of the most overlooked sources of foodborne illness in home kitchens.
Rinse the plunger under hot running water for at least sixty seconds
Lift the plunger out of the bucket and rinse it thoroughly under the hottest tap water you have, focusing on the inside of the cup where bleach residue tends to pool in the deepest part of the rubber. A full minute of running rinse is the minimum, because residual bleach left on the rubber will continue to break down the rubber polymer over time and shorten the working life of the plunger by months. The rubber will start to crack and curl at the rim once it has been exposed to repeated bleach residue, which is why an under-rinsed plunger that gets soaked monthly will fail within a year. If you are rinsing in a utility sink, point the plunger cup-down so the water flows out rather than pooling, then flip it cup-up briefly to flush the seam and the handle base, then back to cup-down for the final thirty seconds. The rinse step is the part of the routine most commonly cut short, and it is the part that most directly affects the long-term durability of the plunger. After rinsing, hold the plunger over the sink for an additional thirty seconds so the residual water drips away before you carry it back to the bathroom.
Wipe the handle from top to bottom with a vinegar-soaked paper towel
The handle is touched by hands every time the plunger is used and is almost never cleaned, which makes it a chronic carrier of contamination back to the user even when the cup itself is freshly sanitized. Soak a paper towel with white vinegar and wipe the handle from the top grip down to the cup, using a fresh towel section for each pass and working in one direction only rather than back and forth. Working in one direction prevents recontaminating the upper handle with residue from the lower handle. Vinegar removes light biofilm and any residual bleach traces from the handle without bleaching the wood, plastic, or paint of a colored handle. Critically, do not use bleach on the handle and then vinegar on the handle, because residual bleach reacting with vinegar produces chlorine gas in small but real quantities. The two products must stay separate at every step. Discard the paper towels in a separate trash bag immediately, knot the bag, and place it directly in the outdoor trash, not the kitchen bin. The same vinegar wipe-down is part of our broader diy bathroom cleaning recipes routine and works equally well on toilet brush handles, which suffer from the exact same chronic contamination problem.
Use an old toothbrush on the seam where the rubber meets the handle
The seam where the rubber cup attaches to the wooden or plastic handle is the single dirtiest part of any plunger and the part that no surface scrub will ever fully clean. Bacteria collect in that crevice and survive routine surface cleaning because no flat brush can reach into the seam, and the dark moist environment of the recessed joint is essentially ideal for biofilm growth. Dip an old toothbrush in the bleach solution that is still in the bucket and scrub the seam from every angle for thirty seconds, working the bristles into the joint at four different positions around the circumference. Use small circular motions rather than long strokes; the circular motion forces the bristles deeper into the seam where straight strokes simply pass over the top. Once the seam has been scrubbed at all four positions, rinse the seam under the hot tap with the plunger held cup-down so water flows through the seam from the inside out, washing any debris away from the joint rather than into it. Discard the toothbrush in the same trash bag as the paper towels. Never put it back into rotation for any other cleaning job, no matter how thoroughly it appears to have been rinsed. The seam-detail step adds about thirty seconds to the routine and is the highest-leverage individual step on this entire list.
Clean the plunger holder while the plunger drip-dries
The holder catches every drip from a contaminated plunger and is itself a reservoir of bacteria that quietly recontaminates the freshly cleaned plunger every time it is returned. The holder is at least as important as the plunger itself in this routine, and is the single most overlooked piece in most household cleaning sessions. Lift the holder off the floor, dump any standing liquid into the toilet (not into a sink), and submerge the entire holder in the same bleach bucket for ten minutes. Make sure the holder is fully submerged with no air pockets in any internal cavities, because plastic holders with closed bottoms often trap an air bubble that protects the inside surface from the bleach. Tilt the holder under the surface to release any trapped air. Scrub the inside corners and the bottom seam with the same brush you used for the plunger cup, paying particular attention to any internal ridges or drainage holes where biofilm collects. Rinse under hot water for at least sixty seconds, then dry the inside with paper towels rather than letting it air-dry, because residual moisture is exactly what allows the next round of biofilm to start. While the holder soaks, leave the plunger upside-down on a folded paper towel inside the bathtub or utility sink so the cup can fully drain and air-dry. A wet plunger returned to a wet holder grows bacteria faster than the cleaning just removed, and within seventy-two hours the holder will smell again as if it had not been cleaned at all.
Pour the used bleach solution down the toilet, then flush twice
When the holder is dry and the plunger has drip-dried for at least fifteen minutes, pour the entire bucket of used bleach solution into the toilet and flush twice. Two flushes matter rather than one because the first flush removes the bulk of the solution and the second clears the residual concentration from the bowl and the upper trap so the next person to use the toilet does not get a face-full of bleach vapor when they raise the seat. Do not pour bleach solution into a kitchen sink or any sink that drains into a septic system in a single concentrated dose. The toilet drain is the appropriate disposal route, and on most municipal systems the dilution from the existing waste line and the high-flow flush handles the bleach concentration without any harm to the plumbing or the downstream treatment plant. Rinse the bucket with hot water immediately and dry it with paper towels, then store the bucket separately from any general-purpose bucket used for mopping or other cleaning. Finally, rinse the brush you used on the plunger by submerging it in fresh hot water in the bucket, swishing it firmly for thirty seconds, then air-drying it on paper towels and storing it labeled. The brush will smell faintly of bleach for the next two days, which is normal and dissipates on its own.
How often this should actually happen
After running this routine on three different plungers in three different homes, the realistic schedule is a full deep clean every time the plunger is used on a soiled clog, regardless of how minor the use felt at the time, and a quick rinse-and-bleach-spray cleaning monthly even when the plunger has not been used at all. The unused-but-monthly clean is the part most people skip, but the holder accumulates ambient bathroom moisture and dust during normal life and the seam at the cup develops biofilm even on a stored plunger sitting in a guest bathroom that has not seen a clog in six months. The seam at the cup is the single most overlooked spot, and once it is cleaned the first time the smell of the bathroom changes noticeably within forty-eight hours in a way that surprises most people who run this routine for the first time. The plunger holder is almost as important as the plunger itself and should be the first thing examined whenever a bathroom develops a faint background sewage smell that nothing else seems to fix. The toothbrush detail on the seam adds about thirty seconds to the routine and is the highest-leverage individual step on this list. If only one part of this routine is going to be done consistently in a busy household, make it the seam scrub plus the holder soak, and the plunger smell problem effectively goes away.
Pro Tips
- ✓Reserve a labeled stiff-bristle brush and an old toothbrush exclusively for plunger and toilet duty.
- ✓Always pre-rinse the plunger by flushing the toilet and plunging clean water before carrying it out of the bathroom.
- ✓Replace the plunger entirely if the rubber cup shows cracks, because cracks harbor bacteria that no soak can fully reach.
How we tested this guide
Every method in this bathroom cleaning guide was hands on tested by Fredler Pierre-Louis using Bleach, Hot water and Five-gallon bucket, on the actual surface or material described and not on a staged photo set. We timed each of the 11 steps, recorded the dwell intervals, and noted where each one worked or fell short, then refined this 8 min guide based on what we observed across multiple test runs in real homes.
- Methods verified on the relevant surface or material before publication.
- Reviewed for chemical safety and surface compatibility before publication.
- Dwell times and proportions across all 11 steps match what actually works, not generic averages.
- Updated whenever a reader reports an edge case we missed.
Read our full editorial and testing policy or learn more about the team behind TryCleaningHacks.
Related Cleaning Guides
Safety Notes
- ⚠Never combine bleach with ammonia, vinegar, or any acid-based cleaner. The reaction produces toxic gases that can cause serious respiratory injury.
- ⚠Always run a window fan or open a window during the bleach soak. Concentrated bleach vapor in a closed bathroom can cause coughing and eye irritation within minutes.
- ⚠Wear disposable rubber gloves for the entire job and a pair of safety glasses if you have them. Bleach splashes can permanently damage eyes.
Frequently Asked Questions
How often should a plunger be deep cleaned?
Every time the plunger is used on a soiled clog, the plunger should be deep cleaned the same day with a full bleach soak. Even if the plunger has not been used at all, run the same routine once a month because the holder collects residual moisture and the seam between the cup and the handle accumulates biofilm over time. Skipping the monthly clean is the single most common reason a bathroom develops a faint background sewage smell that no amount of toilet cleaning fixes.
Can I use vinegar instead of bleach to sanitize the plunger?
No. Vinegar is mildly antibacterial but is not strong enough to inactivate the fecal bacteria and viruses found on a used plunger to the level that public-health guidelines require. Use bleach at the one-cup-per-gallon ratio for the cup and the holder, and reserve vinegar only for the handle wipe-down where the contamination level is much lower. Never combine the two products in the same step, because the mixture produces chlorine gas.
Why does the plunger holder keep smelling even after I clean the plunger?
The holder traps a small amount of liquid every time the plunger is returned wet, and that pooled liquid grows bacteria in the corners and along the bottom seam where a casual rinse cannot reach. Pull the holder out from the wall, soak it in the same bleach solution for at least ten minutes, scrub the inside corners with a stiff brush, and dry it completely with paper towels before returning the plunger to it. Returning a wet plunger to the holder right after cleaning starts the cycle over within hours, so let both pieces fully air-dry before reassembling.
Is it okay to put a plunger in the dishwasher?
No. The dishwasher will not reach the contact-time and temperature combination needed to fully sanitize a plunger, and worse, the plunger will contaminate the interior of the dishwasher in a way that puts subsequent food contact items at risk. Never share a dishwasher between bathroom tools and dishware. Use the bleach-soak method described above in a dedicated plunger bucket that is also reserved for bathroom cleaning only.
When should I just throw the plunger away?
Replace the plunger entirely when the rubber cup develops visible cracks, when the rim of the cup softens or curls, or when the wooden handle splinters at the bottom where it meets the cup. Cracks and splinters create harborage points that no soak can fully clean, and a damaged cup will not form the seal needed to clear a real clog anyway. A standard household plunger costs under fifteen dollars and replacing one every two to three years is appropriate. Bag the old plunger in a sealed trash bag before discarding.
You might also like
How to Remove Hard Water Stains From a Toilet (7 Proven Methods)
My apartment toilet had a rust-brown mineral ring nearly half an inch thick and no prior cleaning had touched it. Here's what actually worked on severe established buildup and the cheap weekly habit that prevents any ring from forming in the first place.
How to Remove Mold and Mildew From Bathroom Caulk (8 Methods)
The bathroom caulk in my first apartment was solid black with mold when I moved in. I tested every method under real conditions on genuinely established mold. Here's what actually worked and the one step most people skip after cleaning that allows mold to return within weeks.

How to Clean a Plastic Shower Curtain Liner by Hand and in a Washer
A plastic shower curtain liner builds up soap scum, mildew, and pink bacteria faster than almost any other bathroom surface, and most people throw theirs out long before it actually needs replacing. I tested both the bathtub hand wash method and the washing machine method on the same heavily soiled liner and recorded which one removed the most stains, how long each took, and what mistakes destroy the liner instead of cleaning it.