
How to Clean Window and Sliding Door Tracks Until They Look New
Window and sliding door tracks collect a black paste of dust, grit, and dead bugs that most people never touch. Here is the dry first, then baking soda and vinegar method I use to get tracks genuinely clean, clear the drainage holes, and keep sliding doors gliding.
Jump to a section
- What you'll need
- Step-by-step
- Vacuum out all the loose grit before you add any water
- Break up the packed gunk in the corners with a dry tool
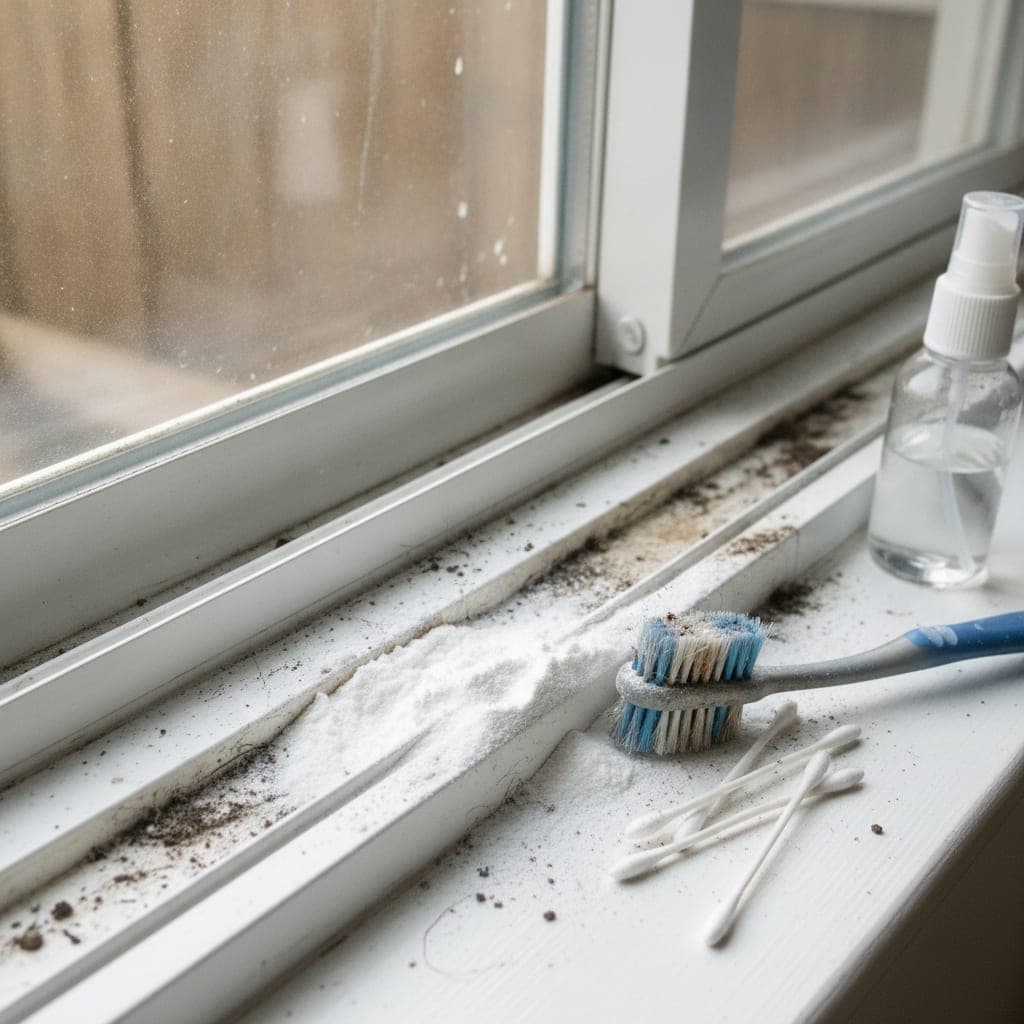
- Sprinkle baking soda, then spray vinegar and let it fizz
- Scrub the tracks with a brush, and the corners with cotton swabs
- Wipe out the slurry, rinse, and dry the track fully
- Clear the weep holes so windows and doors drain properly
- Pro tips
- FAQ
What You'll Need
Step-by-Step Instructions
Vacuum out all the loose grit before you add any water
The single most important rule for tracks is dry first, wet second. If you spray cleaner onto a track full of dry dust and grit, you instantly turn it into a wet mud that smears into the corners and gets harder to remove, not easier. So start with a vacuum and a crevice or small brush attachment and run it along the full length of every track, getting the loose dirt, hair, dead bugs, and gravel out first. Work the corners where the sashes meet, because that is where the debris packs in deepest. For sliding door tracks, which are wider and catch outdoor grit, this dry pass removes a surprising amount before any scrubbing. If you do not have a crevice tool, a dry paintbrush or an old toothbrush sweeps the loose stuff to one end where the vacuum can grab it. Getting the loose material out now means the cleaning solution you add next actually works on the stuck on grime instead of dissolving a fresh mud pie. Do not wet anything yet, even if the track still looks dirty after vacuuming; the stuck on part comes off in the next steps. This dry step is the one people skip, and skipping it is exactly why their tracks end up streaky and half clean. Two minutes with the vacuum saves you ten minutes of pushing mud around.
Break up the packed gunk in the corners with a dry tool
After vacuuming, the corners and the deepest part of the track usually still hold a compacted black crust of grime that the vacuum could not lift. Loosen it while it is still dry. Wrap a thin cloth or a paper towel around the tip of a flathead screwdriver or a butter knife and run it along the track and into each corner to scrape the packed layer loose, then vacuum again. The wrapped tool cleans right into the square corners that a round brush skates over, and the cloth keeps metal from scratching the track. A dry old toothbrush also helps agitate the crust in the flat parts of the track. The point is to reduce the stuck grime to loose crumbs you can vacuum away before you ever add liquid, because everything you remove dry is something you do not have to scrub into a paste later. For window tracks with a lot of built up crud, you may go back and forth between scraping and vacuuming two or three times. Do not force a sharp tool hard against the track or the weatherstripping; you are loosening debris, not gouging metal. Once the corners are down to a thin residue rather than a thick crust, you are ready to bring in the baking soda, which handles the film that dry tools cannot.
Sprinkle baking soda, then spray vinegar and let it fizz
Now for the satisfying part. Sprinkle a light, even line of baking soda along the full length of the dirty track, concentrating on the grimy corners. Then spray white vinegar over the baking soda from a spray bottle and watch it foam up. That fizzing reaction is the same one behind so many baking soda cleaning tricks around the house, and here the bubbling action helps lift the greasy dust film out of the track texture while the mild abrasive baking soda gives you something to scrub against. Let the mixture sit and work for five to ten minutes; do not scrub immediately. This dwell time is what lets the paste loosen the bonded grime so the scrubbing is easy instead of a fight. If the track is only lightly dirty, a spray of straight vinegar and water with a drop of dish soap does the job without the baking soda, similar to a lot of everyday vinegar cleaning uses. For heavily crusted tracks, you can add a second sprinkle of baking soda after the first fizz dies down. One caution worth stating up front: baking soda and vinegar are safe on the aluminum and vinyl of standard tracks, but keep this mix off natural stone thresholds like marble or travertine, where the acid etches the surface. On ordinary window and door tracks, though, this is the workhorse method.
Scrub the tracks with a brush, and the corners with cotton swabs
Once the baking soda and vinegar have had their five to ten minutes, scrub. Use an old toothbrush or a stiffer detail brush and work the paste along the length of the track with firm back and forth strokes, then across, so you catch grime sitting in both directions of the track texture. The paste turns gray and gritty as it pulls the dirt up, which is exactly what you want to see. For the corners and the tight channels where the brush bristles cannot reach, switch to cotton swabs and run them into each square corner; this detail work is what separates a track that looks clean from one that actually is clean, because the corners are where the eye goes. On a sliding door track, use the stiffer brush and more pressure, since those tracks hold coarser outdoor grit. Rinse or refold your tools as they load up with gray slurry. If a stubborn crust remains in one spot, add a touch more vinegar directly to it, wait a minute, and scrub again rather than grinding at it dry. Take your time in the corners; a two minute rush leaves the dark triangles of grime that make the whole track still look dirty. When the paste has gone uniformly gray and no hard crust remains under the brush, you are ready to wipe everything out.
Wipe out the slurry, rinse, and dry the track fully
Now remove all that loosened gray paste. Wipe the track out with damp paper towels or a microfiber cloth, folding to a clean side often and running it into the corners. Then go over the track once more with a cloth dampened in plain water to rinse away the last of the baking soda residue, because dried baking soda leaves a chalky white film if you leave it behind. For the corners, a fresh cotton swab pulls out the slurry the cloth pushes past. Once it is rinsed, dry the track thoroughly with a dry cloth or paper towel. Drying matters more than people think: a track left damp in a low, shaded channel is exactly where mildew starts and where fresh dust immediately sticks, so finishing dry keeps the track clean longer. Check your work by running a clean dry finger or a fresh swab along the corners; if it comes up gray, you have residue left and should rinse that spot again. This is also the moment to notice whether the track is actually clean metal or vinyl now versus just less dirty, and to go back for any section that needs another quick pass. A properly finished track should look close to new, with clean corners and no chalky film, which is the whole payoff for the scrubbing.
Clear the weep holes so windows and doors drain properly
This is the step almost everyone misses, and it is the one that actually protects your home. Sliding windows and doors have small drainage openings called weep holes, usually on the outside face of the bottom track, that let rainwater drain out instead of pooling in the track and seeping inside. All the dirt and debris you just cleaned is exactly what clogs them. With the track clean, find the weep holes and clear them: push a cotton swab, a thin wire, or a toothpick through each one to open it, then pour a little water into the track and confirm it drains out the weep hole rather than sitting in the channel. If the water pools, the hole is still blocked and needs more clearing. Blocked weep holes are a genuine cause of water leaking into walls and around window frames during heavy rain, which leads to the kind of damp conditions that grow mold in caulk and around windows. Some weep holes have a little hinged flap on the outside that can get stuck with grime; free it so it swings. Doing this every time you clean the tracks keeps rainwater moving the way the window was designed to move it, and it is a two minute task that prevents an expensive problem.
For sliding doors, clean the rollers and add a dry lubricant
Sliding glass doors get a heavier version of everything above plus one extra concern: the rollers. Grit that collects in a door track grinds against the wheels every time the door slides, which is why a neglected door gets harder and harder to move. After you have cleaned the track itself, wipe and brush the rollers at the bottom of the door where you can reach them, clearing hair and grit from the wheels so they turn freely. If the door still drags after the track and rollers are clean, apply a dry lubricant made for door tracks, a PTFE or silicone based spray, wiped or sprayed lightly along the track. The key word is dry: do not use an oily lubricant like a general purpose oil or petroleum jelly on a track, because oil grabs dust and grit and turns right back into a grinding paste that makes the problem worse. A dry film lubricant lets the door glide without attracting new dirt. Most sliding doors also have roller height adjustment screws near the bottom edge; if the door is rubbing on one side, a small turn can level it, but go slowly and in small increments. A clean track, clean rollers, and a dry lubricant together are what make a heavy slider glide with one finger again.
Clean the screen and frame while you have everything out
Since the window or door is open and you are already working on it, finish the whole opening rather than making a separate project of it later. If the screen lifts out easily, take it out and rinse it; a screen holds a fine layer of dust and pollen that dulls the light and blows back into the room every time there is a breeze. Lay the screen flat, brush or vacuum both sides, then rinse with a hose or wipe with a damp soapy cloth and let it dry fully before reinstalling. Wipe down the window or door frame and the sash edges with the same vinegar and water solution, since those surfaces collect the same grimy film as the track. For the glass itself, a separate pass with glass cleaner or a vinegar and water mix finishes the job, and if the glass has cloudy mineral spots, the approach for hard water stains on glass clears them. Doing the track, rollers, weep holes, screen, frame, and glass in one session means the whole opening is genuinely clean and you are not back on a ladder or your knees next weekend for the part you skipped. It also lets you spot problems early, like a torn screen or failing weatherstripping, while you have it apart.
Handle any mold or mildew in the track safely
Tracks that stay damp, especially in bathrooms, basements, and shaded north facing windows, can grow black mildew in the corners and along the weatherstripping, which is different from ordinary dirt and needs a different approach. After the normal cleaning, treat visible mildew by spraying the spot with either undiluted white vinegar or hydrogen peroxide, letting it sit for ten minutes, then scrubbing with the toothbrush and wiping clean. Both are effective on the surface mold that grows in tracks, and they are far safer to use in a small, enclosed window channel than bleach fumes. Do not mix them together in the same application, and never mix either with bleach, because combining cleaners can release dangerous gases. The real fix for track mildew, though, is moisture control: clear those weep holes so water drains, dry the track after cleaning, and address any condensation dripping off the glass into the track, since mold cannot grow without the moisture feeding it. If mildew keeps returning in the same spot despite cleaning, water is pooling there, and you should look for a drainage or condensation problem rather than just cleaning it again. Surface mildew on the track wipes away with vinegar or peroxide; recurring mildew is a signal to fix the water.
What actually worked best and what I kept doing afterward
The method I kept is the order more than any one product: vacuum dry, scrape the corners dry, then baking soda and vinegar with a real dwell time, scrub, rinse, dry, and clear the weep holes every single time. The dry first rule is what makes the whole thing work, because trying to shortcut straight to spraying just makes mud. The weep hole step is the one I now never skip, since it is the part that actually protects the house from water damage, not just makes the track look nice. For sliding doors, cleaning the rollers and using a dry lubricant instead of oil is what brought heavy doors back to a one finger glide and kept them that way. What I stopped doing was letting tracks go a full year, because the buildup at that point is a genuine chore; a quick vacuum and wipe every month or two keeps them from ever reaching the black paste stage. The honest limit is that tracks will always collect dirt, since they sit open to dust and outdoor grit by design, so the goal is a fast routine that keeps them maintained rather than a one time deep clean you dread repeating. Clean, dry, draining tracks are worth the small effort, both for how the window looks and for what clogged tracks can cost you.
Mistakes that leave tracks dirty or windows leaking
The most common mistake is wetting the track before vacuuming out the dry grit, which turns loose dirt into a smeared mud that is harder to remove and leaves the corners dark; always go dry first. The second is ignoring the weep holes, which is the mistake that actually matters, because clogged drainage holes let rainwater pool and seep into the wall, so clear them every time. The third, specific to sliding doors, is spraying an oily lubricant like general purpose oil on the track to make it glide; oil grabs grit and quickly turns into a grinding paste that wears the rollers, so use a dry PTFE or silicone lubricant only. People also leave the track wet when they finish, which invites mildew and fresh dust, so always dry it. Another error is using baking soda and vinegar on a natural stone threshold, where the acid etches the stone; keep that combination to aluminum and vinyl tracks. Finally, rushing the corners with only a brush leaves the triangular patches of grime that make a scrubbed track still look dirty; take the extra minute with cotton swabs. Avoid these and you get tracks that genuinely look new, drain the way they should, and slide easily, instead of a job that looks half done and has to be repeated.
Pro Tips
- ✓Do the dry vacuum pass first, always. Everything you remove before adding liquid is grime you do not have to scrub into a paste, and it is the difference between clean corners and smeared mud.
- ✓Wrap a thin cloth around a flathead screwdriver or butter knife to clean right into the square corners a round brush skates over; the cloth protects the track from scratches.
- ✓Keep a box of cotton swabs with your window supplies; the corners are where tracks look dirtiest, and swabs are the only tool that truly cleans them out.
- ✓Test that the weep holes drain by pouring a little water into the finished track. If it pools instead of running out the bottom, the hole is still clogged.
- ✓Use only a dry PTFE or silicone lubricant on sliding door tracks, never oil, because oil attracts grit and turns into a grinding paste that wears out the rollers.
- ✓A quick vacuum and wipe of the tracks every month or two prevents the black paste from ever forming, so you rarely need the full baking soda deep clean.
How we tested this guide
Every method in this deep clean guide was hands on tested by Fredler Pierre-Louis using A vacuum with a crevice or brush attachment, Baking soda and White vinegar in a spray bottle, on the actual surface or material described and not on a staged photo set. We timed each of the 11 steps, recorded the dwell intervals, and noted where each one worked or fell short, then refined this 13 min guide based on what we observed across multiple test runs in real homes.
- Methods verified on the relevant surface or material before publication.
- Reviewed for chemical safety and surface compatibility before publication.
- Dwell times and proportions across all 11 steps match what actually works, not generic averages.
- Updated whenever a reader reports an edge case we missed.
Read our full editorial and testing policy or learn more about the team behind TryCleaningHacks.
Related Cleaning Guides
Safety Notes
- ⚠Never mix vinegar, hydrogen peroxide, or bleach together. Use one at a time and ventilate the area, because combining cleaners can release dangerous gases in an enclosed window channel.
- ⚠Keep the baking soda and vinegar treatment off natural stone thresholds like marble or travertine, where the acid etches and dulls the stone. It is safe on standard aluminum and vinyl tracks.
- ⚠Do not force sharp metal tools hard against the track or weatherstripping. Wrap the tool in cloth and work gently so you loosen debris without gouging the metal or tearing the seals.
- ⚠Use only a dry lubricant on tracks. Oily products create a slick, grit grabbing film that is both a wear problem for the rollers and a slip hazard if it spreads onto the floor.
Frequently Asked Questions
What is the best way to clean really dirty window tracks?
Vacuum out the dry grit first, scrape the packed corners loose with a cloth wrapped screwdriver and vacuum again, then sprinkle baking soda along the track, spray it with white vinegar, and let it fizz for five to ten minutes. Scrub with an old toothbrush and clean the corners with cotton swabs, then wipe out the slurry, rinse away the residue, and dry the track fully. The dry first step is what keeps you from turning the dirt into smeared mud.
Why should I clean the weep holes in my window and door tracks?
Weep holes are the small drainage openings on the outside of the bottom track that let rainwater drain out instead of pooling in the channel. The same dirt that fills your tracks clogs them, and blocked weep holes let water back up and seep into the wall around the window, which causes leaks and mold. Clear each hole with a swab or toothpick and pour in a little water to confirm it drains. It is a two minute step that prevents real water damage.
How do I make my sliding glass door slide easily again?
Most sticking sliders are caused by grit in the track grinding the rollers. Clean the track thoroughly, then wipe and brush the rollers clear of hair and grit. If it still drags, apply a dry PTFE or silicone lubricant along the track. Do not use oil or petroleum jelly, because they attract dust and turn into a grinding paste that makes it worse. Many doors also have roller height adjustment screws near the bottom edge if one side is rubbing.
Is baking soda and vinegar safe for window tracks?
Yes, on standard aluminum and vinyl tracks the baking soda and vinegar method is safe and very effective; the fizzing lifts the grimy film and the baking soda gives a mild abrasive to scrub against. The one exception is natural stone thresholds like marble or travertine, where the acid in vinegar etches the surface, so keep it off stone. On ordinary tracks, just rinse away the baking soda residue afterward so it does not dry into a chalky white film.
How do I get rid of black mold in window tracks?
Spray the moldy spots with either undiluted white vinegar or hydrogen peroxide, let it sit about ten minutes, then scrub with a toothbrush and wipe clean. Both handle the surface mildew that grows in damp tracks, and both are safer in an enclosed window channel than bleach. Never mix them together or with bleach. The lasting fix is moisture control: clear the weep holes, dry the track after cleaning, and address condensation, since mold cannot grow without the moisture feeding it.
How often should I clean my window and door tracks?
Do a full baking soda and vinegar deep clean once or twice a year, and a quick vacuum and wipe every month or two, especially on doors you use daily and windows you open often. Tracks collect dust and outdoor grit by design, so the goal is light regular maintenance rather than one big annual battle. Keeping them vacuumed and the weep holes clear also protects the window hardware and the drainage, not just the appearance.
You might also like
7 Deep Cleaning Tricks That Save Hours Every Week
I timed my bathroom the same way twice, once with my old habit of spray, wipe, repeat, and once with the batch method below. The old way took 45 minutes. The new way took 22. The single change that mattered most was almost embarrassingly simple, and I will tell you exactly what it was. None of this involves buying a gadget or a miracle spray. It is mostly about the order you do things in and where you stop wasting motion. I have cleaned the same rooms hundreds of times, made most of the mistakes, and kept only the moves that actually earned their place.
How to Deep Clean a Shower (10 Proven Methods)
I deep cleaned the same shower twice in one week once with my old routine and once with these ten methods applied in the right sequence. The difference wasn't even close. Here's what changed and the daily habit that eliminated most of my scrubbing for good.
30 Cleaning Myths You Need to Stop Believing
I believed most of these myths for years, and two of them left permanent marks on surfaces in my own house. This is the honest version of what I got wrong, why the popular advice fails, and the two safety myths that actually send people to the emergency room. I have kept the failures in here on purpose, because the mistakes taught me more than the wins did, and a myth is only dangerous while you still trust it.