
How to Clean an Air Fryer (Inside and Out) So It Stops Smoking and Smelling
My air fryer was smoking every time I used it and the basket smelled like last week's chicken wings. I tried the quick-wipe approach for months before finally doing a proper deep clean. The difference was immediate and I wish I had done it sooner. Here is every method I tested and the exact routine that keeps mine grease-free permanently.
Jump to a section
- What you'll need
- Step-by-step
- Why your air fryer gets so dirty so fast
- Always let the air fryer cool before cleaning
- Clean the basket and tray after every single use
- Deep clean the inside of the cooking chamber
- The heating element is the reason your air fryer smokes
- Do not forget the exterior and the vent area
- Pro tips
- FAQ
What You'll Need
Step-by-Step Instructions
Why your air fryer gets so dirty so fast
An air fryer works by circulating extremely hot air around food at high speed, which is what gives you that crispy texture without submerging things in oil. But that rapid air circulation also blows grease, food particles, and oil vapor onto every interior surface including the heating element above the food, the fan behind it, the walls of the cooking chamber, and the underside of the lid. Because the cooking temperatures range from 350 to 400 degrees, that grease bakes onto these surfaces and hardens into a carbonized layer that becomes progressively more difficult to remove the longer you wait. This is exactly why your air fryer starts smoking during cooking even when you are using it correctly. The smoke is not coming from your food. It is coming from old grease burning off the heating element and interior walls. And the smell that lingers between uses is trapped grease and food residue that has been repeatedly heated and cooled until it turns rancid. The good news is that cleaning an air fryer is genuinely straightforward once you know which parts to focus on, and a proper cleaning routine takes less than ten minutes.
Always let the air fryer cool before cleaning
This sounds obvious but it is the first mistake most people make. After cooking, the basket, tray, and interior walls are extremely hot and the temptation to quickly rinse the basket while things are still warm leads to burns and warped components. Let the air fryer cool for at least 30 minutes after use before touching any part of it. Unplug it from the wall during this time. The basket and drawer can be removed to cool on a heat-safe surface, which speeds up the process. Never submerge the main unit in water or run it under the tap. The base contains the motor, heating element, and electrical components and contact with water will damage it permanently. Only the removable basket, tray, and drip pan are safe to wash with water.
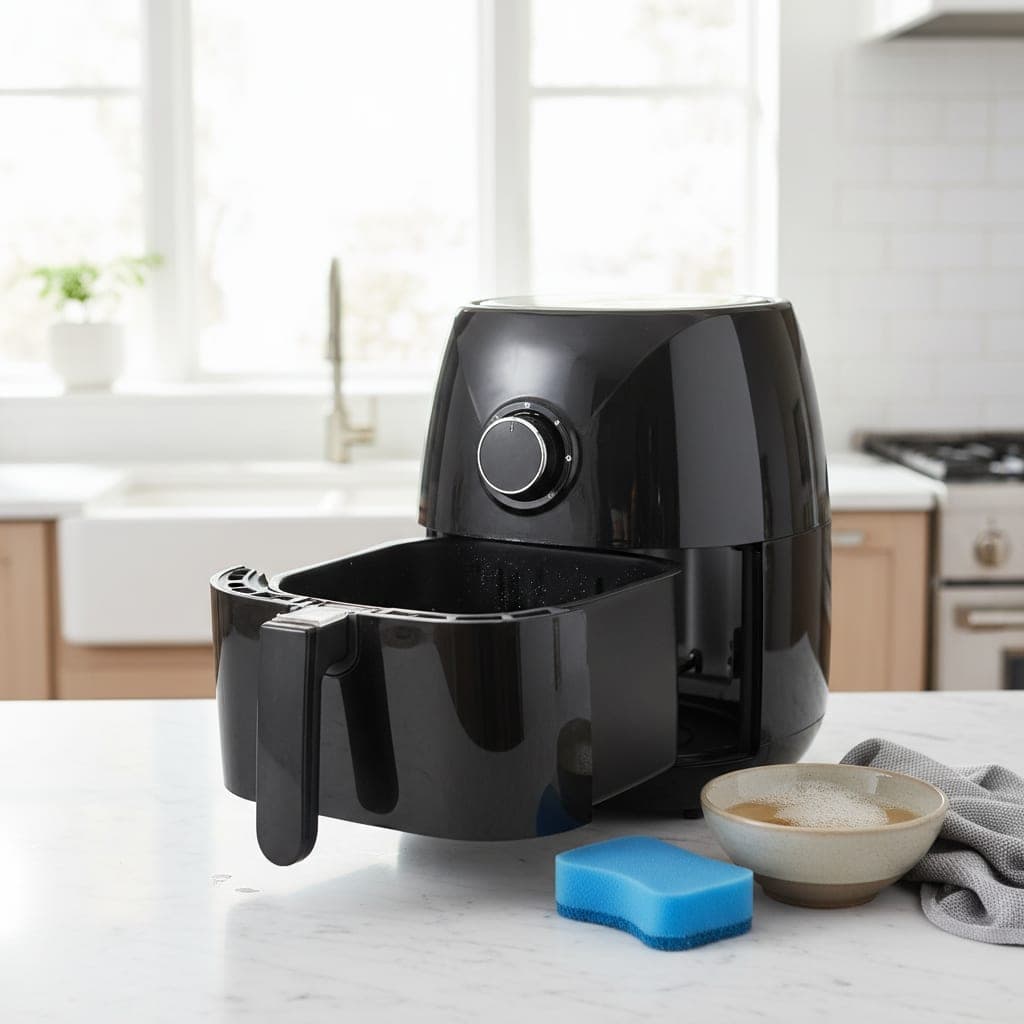
Clean the basket and tray after every single use
The basket and removable tray are the parts that contact food directly and they need to be washed after every use, not every few uses. Fill your kitchen sink with warm water and add a generous squirt of dish soap. Submerge the basket and tray and let them soak for ten minutes. This loosens the baked-on grease and food residue so it wipes off easily rather than requiring aggressive scrubbing. After soaking, use a non-abrasive sponge to wash every surface of the basket including the underside and the mesh or perforated bottom where grease collects in the holes. For stubborn spots that resist the sponge, make a paste of baking soda and a few drops of water and apply it to the greasy area. Let the paste sit for five minutes, then scrub gently. The baking soda provides just enough abrasion to cut through carbonized grease without scratching the non-stick coating. Never use steel wool, metal brushes, or abrasive scouring pads on air fryer baskets because they destroy the non-stick surface and once that coating is scratched, food will stick permanently and the basket becomes nearly impossible to clean.
Deep clean the inside of the cooking chamber
The cooking chamber is the interior cavity where the basket sits and this is where grease splatters accumulate on the walls, floor, and around the edges. Remove the basket and tray completely. Dip a non-abrasive sponge or microfiber cloth in warm soapy water and wipe down every interior surface. For grease that has baked on and turned dark, apply a baking soda paste directly to the spots and let it sit for 15 minutes. The baking soda slowly breaks down the carbonized grease layer and makes it soft enough to wipe away without scraping. Use an old toothbrush to get into corners, edges, and the ridges along the bottom of the chamber where grease pools and hardens. Wipe everything down with a clean damp cloth to remove all soap and baking soda residue. Leaving soap residue inside the chamber means your next cook will have a soapy taste, so do a thorough rinse wipe as the final step. Dry the interior completely with a clean cloth before reassembling.
The heating element is the reason your air fryer smokes
Look at the top of the cooking chamber with the basket removed. You will see the heating element, which looks like a coiled metal bar, and behind it the fan. Grease vapor from cooking rises directly into the heating element and bakes onto its surface cycle after cycle. This is the primary reason air fryers start smoking during use. The smoke is old grease burning off the element at high temperature. To clean it, make sure the air fryer is completely cool and unplugged. Turn the unit upside down so the heating element is facing up and accessible. Use a damp cloth or soft sponge to gently wipe the element. For thick grease buildup, dip an old toothbrush in warm soapy water and gently scrub the coils. Be careful not to bend or damage the element. Never submerge the main unit or pour water into the top. You are wiping and spot cleaning only. A soft damp cloth is all you need for regular maintenance. For heavy buildup that has carbonized into a hard black layer, apply a small amount of baking soda paste to the toothbrush and work it into the crusty areas with gentle pressure. Wipe clean with a damp cloth afterward and let the element dry completely before using the air fryer again.
Do not forget the exterior and the vent area
The outside of the air fryer collects grease film, fingerprints, and kitchen dust that sticks to the oily surface. Wipe the exterior with a microfiber cloth dampened with a solution of equal parts water and white vinegar. This cuts through the greasy film and leaves a streak-free finish. Pay attention to the air intake and exhaust vents, usually located on the back or sides of the unit. These vents pull air in and push hot air out, and when they are clogged with dust and grease, airflow is restricted. Reduced airflow means longer cooking times, uneven results, and the motor working harder than it needs to. Use a dry toothbrush to gently brush dust and debris out of the vent openings. Never use water on the vents because it can drip into the motor housing. Clean the exterior once a week if you use the air fryer frequently, or whenever you notice a greasy film when you touch it.
The vinegar steam trick for stubborn interior grease
If your air fryer has weeks or months of baked-on grease that resists the sponge and baking soda paste, try the vinegar steam method. Place a small oven-safe dish or ramekin inside the clean empty basket. Fill it with a mixture of one cup of water and one tablespoon of white vinegar. Run the air fryer at 350 degrees for three to five minutes. The steam from the vinegar solution softens the carbonized grease on the interior walls and heating element, making it dramatically easier to wipe away. After the cycle, unplug the air fryer and let it cool for ten minutes. Then wipe down every interior surface with a damp cloth. The grease that was rock-hard before should now wipe off with minimal effort. This steam method is the closest equivalent to a self-cleaning function and it works especially well on the heating element where direct scrubbing is difficult. Repeat if necessary for extreme cases.
How to deal with the lingering food smell between uses
If your air fryer holds the smell of the last thing you cooked, especially fish, bacon, or heavily seasoned foods, a simple deodorizing step fixes it completely. After cleaning the basket and interior, place a tablespoon of baking soda in a small dish inside the basket and close the drawer. Leave it overnight. The baking soda absorbs the trapped odors from every surface. For stronger smells, cut a lemon in half and place both halves in the basket. Run the air fryer at 300 degrees for two minutes. The citric acid vapor neutralizes food odors and leaves a clean, neutral scent. This lemon trick is especially useful after cooking fish, where even thorough washing sometimes does not fully remove the smell. Once the odor is gone, it stays gone until the next strong-smelling cook.
A simple weekly routine that prevents buildup entirely
The best way to keep an air fryer clean is to prevent heavy buildup from ever forming in the first place. After every use, wash the basket and tray with soapy water. This takes about three minutes and prevents grease from carbonizing. Once a week, wipe down the interior chamber with a damp soapy cloth, paying attention to the walls and the bottom edges. Once a month, flip the unit over and wipe the heating element with a damp cloth and do the vinegar steam cycle if you notice any discoloration. This entire monthly routine takes less than ten minutes and it completely eliminates the smoking, odor, and performance issues that come from neglected maintenance. If you are cooking particularly greasy foods like bacon, wings, or sausages, line the bottom of the basket with a small piece of parchment paper designed for air fryers. The paper catches dripping grease and prevents it from baking onto the basket bottom and drip tray, cutting your post-cook cleanup time in half.
What made the biggest difference and what I stopped doing
The heating element cleaning stopped the smoking instantly. I had assumed the smoke was coming from grease in the basket, but the basket was clean. The real source was a thick layer of carbonized grease on the heating coil that I had never thought to check. One cleaning with a damp toothbrush and baking soda paste eliminated smoking completely. The second biggest improvement came from washing the basket after every use rather than every two or three uses. The non-stick coating works dramatically better when grease is not allowed to build up and polymerize on the surface. What I stopped doing: using cooking spray directly on the basket. The propellants in aerosol cooking sprays leave a sticky residue on non-stick surfaces that builds up over time and eventually turns into a gummy, near-impossible-to-remove layer. I switched to lightly brushing food with oil using a silicone brush before placing it in the basket and the sticky buildup problem disappeared entirely.
Mistakes that ruin your air fryer or make cleaning harder
Mistake one: using steel wool or metal scourers on the non-stick basket. One scrub with steel wool and the non-stick coating is permanently damaged. Food sticks, cleaning becomes three times harder, and you end up needing a replacement basket. Always use soft sponges and non-abrasive materials. Mistake two: waiting days between cleans. Even a single use without cleaning allows grease to bake into a hard layer during the next cooking session. The second layer is exponentially harder to remove than the first. Cleaning immediately after cooling prevents this compounding effect. Mistake three: soaking the main unit in water or running it under the faucet. Only the removable basket and tray are washable. The base unit with the motor, heating element, and electronics must never contact water directly. Wipe it with a damp cloth only. Mistake four: using the dishwasher for air fryer baskets without checking the manual. Some baskets are dishwasher safe and some are not. The harsh dishwasher detergent and high heat can degrade certain non-stick coatings faster than hand washing. When in doubt, hand wash.
Pro Tips
- ✓Flip the air fryer upside down monthly to access and wipe the heating element. This single step eliminates smoking during cooking.
- ✓Use a silicone brush to oil food directly instead of spraying the basket with cooking spray. Aerosol propellants leave a sticky residue that ruins non-stick coatings over time.
- ✓Line the basket with air fryer parchment paper when cooking greasy foods like bacon or wings to catch dripping grease and cut cleanup time in half.
How we tested this guide
Every method on this page was hands on tested by Fredler Pierre-Louis on the actual surface or material described, not on a staged photo set. We recorded the timing, the dwell intervals, and the conditions where each method worked or fell short, then refined the steps based on what we observed across multiple test runs in real homes.
- Methods verified on the relevant surface or material before publication.
- Reviewed for chemical safety and surface compatibility before publication.
- Dwell times and proportions match what actually works, not generic averages.
- Updated whenever a reader reports an edge case we missed.
Read our full editorial and testing policy or learn more about the team behind TryCleaningHacks.
Related Cleaning Guides
Safety Notes
- ⚠Always unplug the air fryer and let it cool completely for at least 30 minutes before cleaning any part of it. The heating element and interior surfaces retain extreme heat after cooking.
- ⚠Never submerge the main base unit in water or run it under the tap. The base contains the motor, electrical components, and heating element. Contact with water will cause permanent damage and create a shock hazard.
- ⚠Avoid using metal utensils, steel wool, or abrasive scouring pads on non-stick air fryer baskets. Scratched non-stick coating can flake off into food and the basket will need to be replaced.
Frequently Asked Questions
How often should you clean an air fryer?
Wash the basket and tray after every use with warm soapy water. Wipe the interior chamber weekly. Clean the heating element and do a deep clean once a month. This routine prevents grease buildup, eliminates smoking, and keeps your air fryer performing like new.
Why is my air fryer smoking even with no food in it?
Smoke from an empty air fryer is caused by old grease that has baked onto the heating element above the food. Turn the unit upside down and gently clean the heating coils with a damp cloth and baking soda paste. This is the most common cause of air fryer smoking and it is fixed in a single cleaning.
Can you put an air fryer basket in the dishwasher?
Check your air fryer manual first. Some baskets are dishwasher safe and some are not. Dishwasher detergent is harsher than hand soap and can degrade certain non-stick coatings over time. When in doubt, hand wash with a non-abrasive sponge and warm soapy water for the longest basket life.
How do you get baked-on grease off an air fryer basket?
Soak the basket in warm soapy water for ten minutes, then apply a paste of baking soda and water to the greasy areas. Let the paste sit for five minutes and scrub with a non-abrasive sponge. For extreme buildup, use the vinegar steam method: run the air fryer with a dish of water and vinegar at 350 degrees for three minutes to soften the grease before wiping.
What should you never use to clean an air fryer?
Never use steel wool, metal brushes, or abrasive scouring pads on non-stick surfaces. Never use aerosol oven cleaner inside an air fryer. Never submerge the main base unit in water. These cause permanent damage to the non-stick coating, internal components, and electrical systems.
You might also like

How to Clean Your Laundry Room in Under 30 Minutes
My laundry room was the last room I ever cleaned, which meant the machines doing all my cleaning were themselves never cleaned. One afternoon changed that. Here's what I found inside my filter, what was creating the musty smell, and the 30-minute routine that prevents it all.

How to Get Rid of Kitchen Sink Odor (10 Easy Fixes)
My kitchen sink smelled no matter how often I cleaned it until I figured out what I was actually missing. The fix wasn't a new product; it was addressing three different sources at once. Here's what finally worked and the one mistake that kept the smell coming back.

How to Clean a Microwave Inside and Out (12 Methods)
I once cleaned a shared microwave at work that hadn't been touched in 18 months. Every method on this list either worked or didn't under genuinely difficult conditions. Here's the honest ranking and the one daily habit that makes the entire list mostly unnecessary.