

How to Clean Your Laundry Room in Under 30 Minutes
The machines that clean everything else in the house are usually the last things in it to get cleaned, and a washer is the one appliance that can develop a smell while doing its job perfectly. Most laundry room problems come down to three things: residue building up where water sits, lint collecting where air is supposed to move, and a filter almost nobody knows exists. Here is a 30 minute routine that covers the weekly reality, the two jobs that need doing a few times a year instead, and the reason a front loader starts smelling in the first place.
Jump to a section
- What you'll need
- Step-by-step
- Start the washer cleaning cycle, then leave it alone
- Scrub the door gasket, including the fold you cannot see
- Empty the drain pump filter, which most people never open
- Pull out the detergent drawer and wash it in the sink
- Clear the lint trap, then test it for film
- Clean the dryer vent duct, and do it properly a few times a year
- Pro tips
- FAQ
What You'll Need
Step-by-Step Instructions
Start the washer cleaning cycle, then leave it alone
Put this first for the same reason you spray a toilet before you touch anything else: it runs for an hour while you do everything else, so it costs you no time at all. If your machine has a tub clean or sanitize cycle, use it, and add either a proper machine cleaner or about two cups of white vinegar to the drum rather than the detergent drawer. If it has no dedicated cycle, run the longest, hottest wash with the drum empty. Do not add bleach and vinegar in the same cycle, and do not add detergent, since detergent residue is usually the thing you are trying to remove. Understanding why this matters makes it stick. Front loaders use a fraction of the water a top loader does, which is good for the bill and bad for rinsing, so soap, body oil and fabric softener leave a film inside the drum and the hoses. That film feeds bacteria, and bacteria are what you smell. A hot empty cycle with an acid or an oxidizer strips the film off. Once a month is plenty for most households, more often if you wash mostly cold or use a lot of softener.
Scrub the door gasket, including the fold you cannot see
On a front loader, the rubber seal around the door is where the black speckling lives, and it is the single most common source of laundry smell. Pull the fold of the gasket toward you with your fingers and look underneath with a flashlight. That hidden channel collects water, lint, hair, coins and detergent sludge, and it stays damp permanently because the door spends most of its life closed on top of it. Wipe it with a cloth dampened in a mild cleaner or diluted vinegar, working all the way around, then use an old toothbrush in the tighter creases. Dry it properly afterward, because leaving it wet defeats the point. Two honest limits. Speckling that wipes off was surface growth and it will come back unless the drying habit changes. Speckling that stays after a firm scrub has grown into the rubber, and no amount of cleaning removes it, though a stained gasket that is still flexible and sealing is a cosmetic problem rather than a functional one. Replacement gaskets are available for most machines and are a moderate job, not a new machine.
Empty the drain pump filter, which most people never open
This is the step that surprises people, because most front loaders have a small access panel at the bottom front hiding a filter that catches everything the pump cannot handle, and many machines run for years without it being opened once. Standing water sitting in a clogged filter is a smell source that survives every tub clean you run. Check your manual, then lay a towel down and put a shallow tray underneath, because water will come out and there is usually more of it than expected. Some machines have a small drain hose beside the filter to empty first. Unscrew the filter, pull it out, and clear what is in there: lint, hair, buttons, coins, the occasional sock. Rinse it under the tap, check the housing with a flashlight, and screw it back in firmly, because a loose filter leaks. Do this every couple of months. If your machine loses water slowly, drums on for ages before draining, or throws a drain error, this filter is the first thing to check and the cheapest problem to fix in the entire room.
Pull out the detergent drawer and wash it in the sink
The dispenser drawer is a wet, enclosed plastic box that receives concentrated soap and softener, so it grows a pink or gray sludge that eventually blocks the siphon holes and stops the machine dispensing properly. Most drawers pull all the way out with a squeeze or a small release tab, and the manual will say which. Take it to the sink, soak it in hot water for a few minutes, and clean the corners and the underside of the softener siphon cap with a toothbrush. Then look into the empty recess in the machine with a flashlight, because the roof of that cavity collects the same sludge and never gets touched by a drawer wash. Wipe what you can reach. The fabric softener compartment is nearly always the worst of it, since softener is thick and does not rinse. If you use softener regularly, this is a monthly job. It is also worth asking whether you need it at all, because softener coats fibers, and on towels it reduces absorbency while leaving exactly the residue you keep cleaning out.
Clear the lint trap, then test it for film
Pulling the visible lint off the dryer screen after each load is basic, and most people do it. The part that gets missed is the invisible film. Dryer sheets and softener leave a waxy coating on the mesh that restricts airflow while looking perfectly clean, which makes the dryer run longer and hotter for the same load. The test takes ten seconds: hold the screen under a running tap. Water should pass straight through. If it pools or beads on the mesh, there is a film, and the fix is a scrub with warm water, a drop of dish soap and a soft brush, then a full dry before it goes back in. Every few months is enough. While the screen is out, shine a flashlight into the slot it sits in and vacuum out the lint that has fallen down there with a crevice tool. That slot is inside a hot appliance, which is precisely why it is worth keeping clear.
Clean the dryer vent duct, and do it properly a few times a year
This is the one job in the laundry room with a genuine fire risk attached, and it is also the one most likely to have never been done. Lint escapes past the screen, coats the inside of the duct, and restricts the airflow the dryer needs to exhaust hot, damp air. Unplug the dryer, or turn off the gas if it is a gas model, pull it away from the wall, and disconnect the duct from the back. Run a long flexible vent brush through from both ends, then vacuum the duct, the outlet on the back of the dryer, and the wall port. Go outside and check the exterior flap actually opens and is not blocked by lint, a bird nest, or paint. Two things make a vent worse: flexible foil or plastic ducting, which has ridges that catch lint, and long runs with several bends. Rigid or semi rigid metal duct, kept as short and straight as possible, stays cleaner and moves more air. Signs yours needs attention: clothes taking two cycles to dry, the dryer or the laundry room getting unusually hot, or a burning smell. Treat this as quarterly, not part of the 30 minutes.
Wipe the dryer's moisture sensor if clothes come out damp
Automatic dry cycles do not run on a timer, they run until two small metal strips inside the drum stop detecting moisture in the clothes tumbling past. Fabric softener and dryer sheet residue build a film on those strips, and a coated sensor reads dry clothes as dry very early, which is why a load can come out of a full auto cycle still damp at the seams. Find the sensor bars, usually a pair of thin metal strips on the front bulkhead near the lint screen, and wipe them with a cloth dampened with rubbing alcohol. Do not use anything abrasive. This takes under a minute and it is the first thing to try when a dryer starts underperforming, well before assuming an element or a thermostat has failed. If the clothes are still damp after cleaning the sensor, the screen and the vent, then the problem is likely airflow or heat and worth a service call.
Vacuum behind and underneath both machines
Behind the machines is a dust and lint trap, and it sits directly behind an appliance that runs hot, which is reason enough to keep it clear. Unplug both machines, or at minimum the dryer, and walk them out far enough to reach. Vacuum the floor, the baseboard, the wall, the back panels, and the coils or vents on the back of each machine. Use the brush attachment on the back of the appliances and the crevice tool along the wall join. While you have access, look at three things you cannot normally see. Check the water inlet hoses for bulges, cracks, rust at the fittings, or damp, since a burst inlet hose is one of the more expensive failures a house can have and rubber hoses are usually recommended for replacement every five years or so, with braided stainless being the sturdier choice. Check the drain hose is not kinked and is properly secured. And check the floor for old water staining, which is a slow leak leaving a record even if nothing is wet today.
Level the machines while they are still pulled out
A washer that shakes hard, walks across the floor, or bangs during the spin cycle is usually not broken, it is not level, and vibration that severe wears bearings and loosens fittings over time. Put a spirit level, or the level app on a phone, on top of the machine front to back and side to side. Adjust the threaded feet until it reads level both ways and the machine does not rock when you push a corner. All four feet must be in firm contact with the floor, and the back feet on some models are self adjusting, so tilt the machine forward slightly and set it down to let them settle. If the floor itself flexes, a sheet of plywood underneath spreads the load. This takes five minutes, it is genuinely part of keeping the machines alive, and it is not something anyone thinks to do until something is already rattling.
Wipe the exteriors, the control panel and the door glass
Now the outsides, which is mostly cosmetic but takes very little time. A cloth with mild cleaner handles the tops, sides and fronts. On a stainless finish, wipe along the visible grain and follow with a dry cloth, since water left on steel dries as spots. Spray the cloth rather than the control panel, because liquid running into buttons or a touch display is a real way to kill one. The inside of the door glass on a front loader usually has a film of detergent residue and a ring where water sits, and both come off with a little vinegar on a cloth. Do the door handles and the lid edge too, since those get touched with hands that have just been sorting laundry. Finish with the top edge of the machines and any shelf above them, which collects dust that then falls onto clean clothes. The inside of the dryer drum is worth a wipe at the same time, particularly if something has melted in there, a crayon or a lip balm left in a pocket, since that residue transfers to every load afterward. A cloth with a little rubbing alcohol lifts most of it, and it is worth running the empty drum with a few old damp towels afterward to pick up anything left behind. Check the pockets of the machine door seal on the dryer too, where socks and tissue hide and then reappear mid cycle.
Sort out the detergent shelf and store it safely
Group what you actually use, get rid of what you do not, and wipe the shelf, since drips of detergent and softener dry into a sticky film that traps dust. Wipe the bottle necks and caps as you go, because that is where most of the mess originates. Two safety points belong here rather than as an afterthought. Detergent pods look exactly like candy and are a serious poisoning risk for young children, so they belong in a closed, high, ideally latched container, not in an open jar on a low shelf. And never store chlorine bleach next to ammonia based cleaners, or use them anywhere near each other, because the combination produces a toxic gas. Keep the bleach separate and clearly identified. Beyond safety, a shelf with fewer bottles genuinely speeds up laundry, because most of the time lost in a laundry room is spent moving things to reach other things.
Clean the utility sink and check the drain
A utility sink takes paint water, mop water and hand washing, so it collects a gray film that is mostly soap and grit. Scrub it with baking soda and a brush, which handles the film without scratching, then rinse. If the sink drains slowly, the trap under it is the likely culprit, and clearing a utility sink trap is usually simpler than a kitchen one because the plumbing is exposed. A laundry room can smell sour even when everything is clean, and when it does, a drain is usually responsible. If there is a floor drain, its trap can dry out during a long stretch of no use, which lets sewer gas come up, and the fix is nothing more than pouring a jug of water down it every few weeks. The washer's own standpipe should also be checked for gurgling or backing up during a drain cycle, which points to a partial blockage worth clearing before it becomes an overflow.
Sweep and mop last, then dry the floor properly
Floor goes last, once the lint from behind the machines and the drips from the filter are already on it. Sweep or vacuum first, paying attention to the corners and the gap under the machines where lint accumulates as a fuzzy line. Then mop with whatever suits the floor, and wring the mop out well, because a laundry room floor is often the one place in the house where standing water goes unnoticed for hours behind an appliance. Dry the area in front of the washer with a towel rather than leaving it to air. Any floor that stays damp next to warm appliances is an invitation for mildew along the baseboard, and the baseboard behind a washer is a place nobody looks until it has already swollen.
What tends to be back there, and why it matters
Pulling the machines out for the first time in a while usually turns up the same short list, and knowing what to expect makes it less alarming and easier to act on. A layer of lint on the floor and along the wall behind the dryer, which is combustible material against a hot appliance. Black speckling in the folds of the washer gasket, which is why the clean laundry has a faint smell that survives a hot wash. Standing water and a wad of lint in the drain pump filter, which is a smell that no tub clean will ever reach. A dried out floor drain, if the room has one. And water staining on the floor or the baseboard, which records a leak that may have stopped or may be ongoing. None of these are unusual, and all of them are cheaper to deal with today than after the fact. The lint and the vent are the two that carry real risk. The rest are hygiene and smell.
The mistakes that cost machines years of life
Overdosing detergent is the big one, and it is nearly universal. More soap does not clean better, it rinses out less, and the residue left in the drum and hoses is the food source behind almost every musty machine. Modern detergents are concentrated and high efficiency machines use little water, so the correct dose is usually far less than the cap suggests. If your clothes come out stiff or your machine smells, cut the dose before you buy anything. Second, closing the door and the detergent drawer after the last load, which seals the damp inside. Leave both ajar so the drum can dry. Third, leaving wet washing in the drum for hours, which reintroduces the smell you just cleaned away. Fourth, using a rigid dryer schedule while ignoring the vent, which is both a fire risk and the reason the drying takes two cycles. Fifth, using chlorine bleach and vinegar in the same cycle, or bleach anywhere near ammonia, which is a genuine hazard rather than a housekeeping preference.
A schedule that keeps the whole thing to 30 minutes
The 30 minute version is realistic only if the heavy jobs are on a longer cycle, so split them deliberately. After every load: pull the lint from the dryer screen, wipe the gasket fold with a dry cloth, and leave the washer door and drawer ajar. Weekly: wipe the machine exteriors and the shelf, sweep the floor, and dry the area in front of the washer. Monthly: run the tub clean cycle, wash the detergent drawer, scrub the gasket properly, and check the lint screen for film with the water test. Every two or three months: empty the drain pump filter and clean the moisture sensor. Quarterly to twice a year: clean the vent duct end to end, vacuum behind both machines, inspect the inlet hoses, and check the exterior vent flap. Once a year: check the machines are still level and replace inlet hoses if they are approaching five years old. Written down like that it looks like a lot. In practice the daily items take under a minute and the monthly pass runs while you are doing something else.
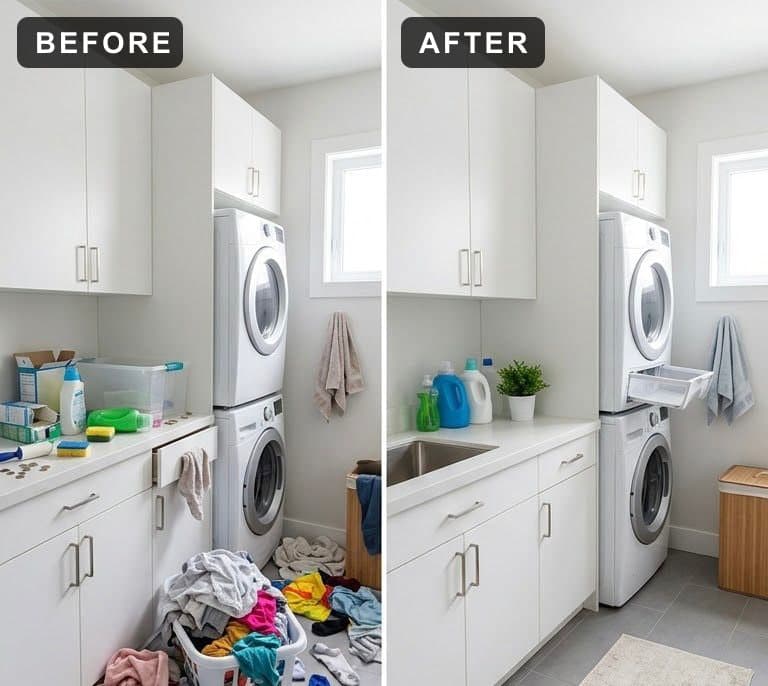
What the difference looks like
Pro Tips
- Start the tub clean cycle first and do everything else while it runs. It is an hour of machine time that costs you none of your own.
- Keep a dedicated cloth on top of the dryer purely for the gasket fold. The habit only survives if the cloth is already there when the load comes out.
- Photograph your drain pump filter location and the direction it unscrews the first time you open it, since the manual is rarely nearby the second time.
- If clothes are taking two cycles to dry, check in this order before calling anyone: lint screen film, sensor bars, vent duct, exterior flap. Three of those four cost nothing.
Frequently Asked Questions
Why does my front load washer smell even though I clean it?
Almost always one of three places, and the tub clean cycle only reaches one of them. The gasket fold holds water and sludge permanently because the door closes on it. The detergent drawer, especially the softener compartment, grows sludge that a drum cycle never touches. And the drain pump filter at the bottom front holds standing water and lint, which is the source most people have never opened. Add too much detergent and all three get worse, since low water volume plus excess soap leaves residue that feeds bacteria. Cut the dose, clean those three by hand, and leave the door and drawer ajar between loads.
How often should I clean the dryer vent?
A few times a year for most households, and more often with a long duct run, several bends, or flexible foil ducting, all of which trap lint. Rather than working purely to a calendar, act on the symptoms: clothes needing two cycles, the dryer or room running hot, or a burning smell. Check the exterior flap opens freely at the same time, since a blocked outdoor vent undoes a clean duct. This is a fire risk rather than a housekeeping preference, which is why it is worth doing properly with a vent brush rather than a quick vacuum at the wall.
Do I really need to clean the drain filter on my washing machine?
If your machine has one, yes, and most front loaders do behind a small panel at the bottom front. It catches lint, hair, coins and buttons, and once it clogs it holds standing water that smells regardless of how many tub cleans you run. It is also the first thing to check if the machine drains slowly or throws a drain error. Every couple of months is enough. Check the manual first, lay a towel and a tray down, and expect water.
Is fabric softener bad for my washing machine?
It is the main contributor to the sludge in the dispenser drawer and it adds to the film inside the drum and hoses, because it is thick and does not rinse away cleanly in a low water machine. It also coats fabric, which is the point on some items and a problem on others, reducing absorbency on towels and breathability on activewear. If you use it, expect to clean the drawer monthly. Wool dryer balls or a dose of white vinegar in the rinse are the usual alternatives when the goal is softness without the residue.
What is the fastest useful thing I can do in the laundry room today?
Three things, under five minutes total. Pull the fold of the washer gasket back and wipe it dry, because that is where the smell lives. Hold the dryer lint screen under a tap and see whether water passes through, since a film there is making every load run longer. And leave the washer door and detergent drawer ajar from now on. If you have ten more minutes, open the drain pump filter, which is the highest chance of finding something genuinely worth removing.
How this guide was made
This Deep Clean guide was researched, written, edited, and published by Fredler Pierre-Louis. The 16 steps below are built around White vinegar or a washing machine tub cleaner, Baking soda and Microfiber cloths, three or four, and the quantities and dwell times come from published cleaning-chemistry and manufacturer guidance for those materials, not from a controlled trial we ran ourselves. Where a popular version of this hack does not work, or is risky on a particular surface, this 15 min guide says so.
- Checked against manufacturer and materials guidance for the surfaces named.
- Reviewed by a person for chemical safety and surface compatibility before publication.
- Written to explain why a method works, not just to list steps.
- Corrected whenever a reader reports an error or an edge case we missed.
Read our full editorial policy or learn more about the team behind TryCleaningHacks.
Related Cleaning Guides
Safety Notes
- Unplug the machines before pulling them out or reaching behind them, and shut off the gas on a gas dryer.
- Lint in a dryer vent is a genuine fire risk, and it is the reason the vent job is on this list rather than being optional. Clothes drying slowly or a hot laundry room are the signs to act on.
- Never use chlorine bleach and vinegar in the same cycle, and never store or use bleach near ammonia based cleaners. Both combinations produce harmful gas.
- Store detergent pods closed, high and out of reach. They look like candy and are a serious poisoning risk to young children.
- Expect water when you open the drain pump filter, and put a tray and towel down first. On a raised pedestal, that water runs further than you expect.
- Burst washer inlet hoses cause serious water damage. Check for bulging, cracking or rust at the fittings, and consider braided stainless replacements at around five years.
You might also like

7 Deep Cleaning Tricks That Save Hours Every Week
Most of the time spent cleaning a bathroom is spent waiting or backtracking, not scrubbing. Spraying one surface, waiting for it, wiping it, then starting the next one means you pay every dwell time separately. Batching those dwell times so every cleaner works at once is the single change that cuts the job roughly in half. None of this involves a gadget or a miracle spray, just the order you work in and where you stop wasting motion.
How to Deep Clean a Shower (10 Proven Methods)
I deep cleaned the same shower twice in one week once with my old routine and once with these ten methods applied in the right sequence. The difference wasn't even close. Here's what changed and the daily habit that eliminated most of my scrubbing for good.
30 Cleaning Myths You Need to Stop Believing
I believed most of these myths for years, and two of them left permanent marks on surfaces in my own house. This is the honest version of what I got wrong, why the popular advice fails, and the two safety myths that actually send people to the emergency room. I have kept the failures in here on purpose, because the mistakes taught me more than the wins did, and a myth is only dangerous while you still trust it.