
How to Clean a Robot Vacuum So It Stops Streaking, Smelling, and Getting Stuck
My robot vacuum started leaving faint gray streaks on the kitchen tile, getting stuck on the same rug edge every run, and giving off a faint dusty smell when it docked. None of that was a broken machine, it was a maintenance problem. Here is the full cleaning routine in the order that fixed each symptom, plus the parts almost everyone forgets until the motor strains.
Jump to a section
- What you'll need
- Step-by-step
- Power the unit off and understand why a dirty robot vacuum underperforms
- Empty and wash the dustbin, then dry it completely before reinstalling
- Tap and dry-brush the filter, and replace it if the dust has gone gray and matted
- Cut and pull the hair off the main brush roller, the number-one cause of streaking
- Clear the side brush and check the axle underneath it
- Wipe the cliff and floor sensors so the robot stops getting stuck and misreading edges
- Pro tips
- FAQ
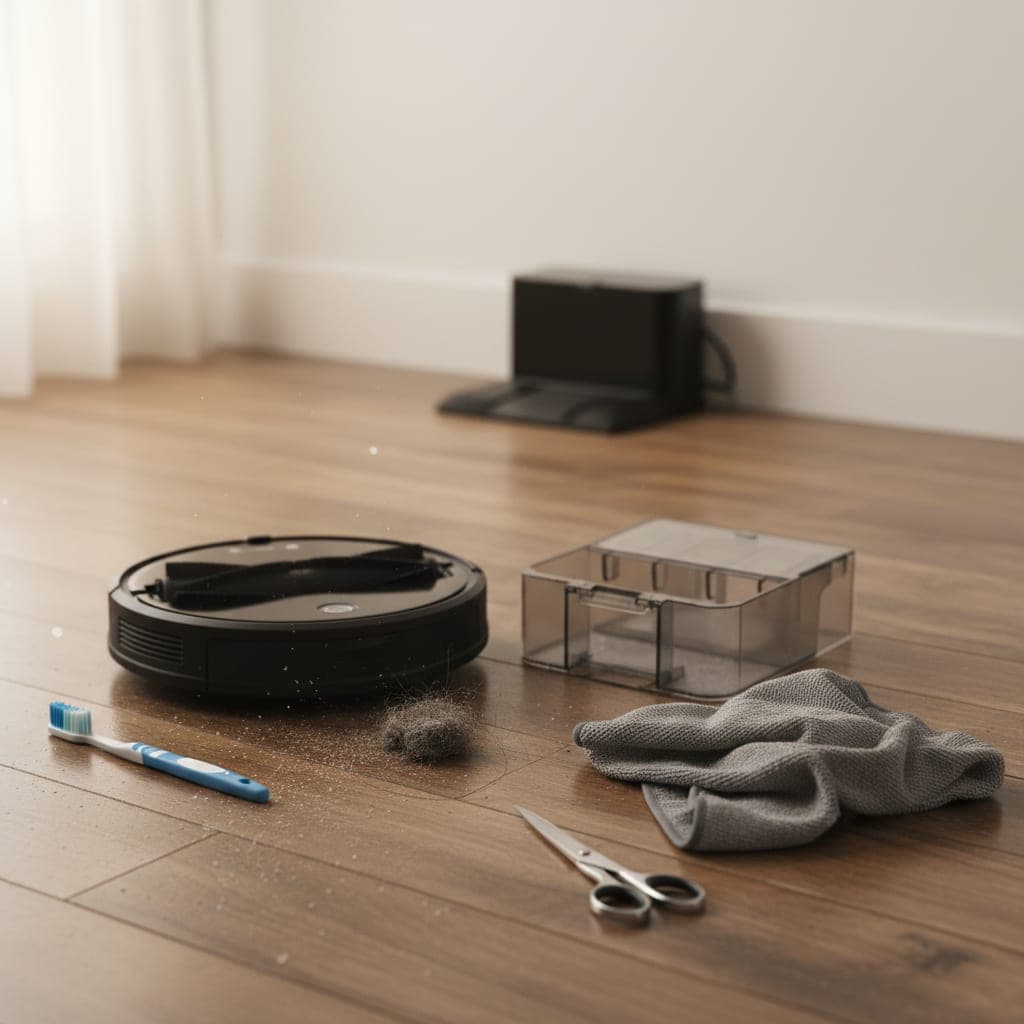
What You'll Need
Step-by-Step Instructions
Power the unit off and understand why a dirty robot vacuum underperforms
Before touching anything, turn the robot vacuum fully off using the power switch on the underside rather than just lifting it off the dock, because the brushes and wheels can spin unexpectedly during cleaning and the side brush can flick debris into your eyes. A robot vacuum loses suction and starts misbehaving for predictable mechanical reasons, not because it is wearing out. Hair and fibers wrap around the main brush roller and the side brush axle until they bind, the filter clogs with fine dust until airflow drops, the cliff and floor sensors film over with a dust haze that makes the robot misjudge edges and rugs, and the wheels and the charging contacts collect grime that affects both traction and docking. Every symptom people blame on a failing battery or motor, the streaking, the getting stuck, the dusty smell, the failure to return to the dock, traces back to one of these specific buildup points. Cleaning them in order restores the machine to near-new performance, and on most models the whole routine takes under fifteen minutes once you know where to look. Work over a trash can or outdoors, because this job is genuinely dusty and you do not want to redeposit everything you remove onto the floor the robot just cleaned. Many of the same maintenance principles apply to an upright vacuum, which our 10 vacuum cleaning tips most people miss guide covers in detail.
Empty and wash the dustbin, then dry it completely before reinstalling
Pull the dustbin out and empty it into the trash after every few runs, but for a real cleaning, take the bin to the sink. Most bins separate from their filter, so remove the filter first and set it aside dry, because the filter must never get wet on the vast majority of models. Rinse the empty bin under warm water with a drop of mild dish soap to remove the fine dust film that clings to the inside walls and the seal, and use a small soft brush to clear the corners and the air intake slot where compacted dust bridges across and chokes airflow. The faint dusty smell that a robot gives off when it runs or docks almost always comes from this film of fine organic dust inside a bin that has only ever been emptied, never washed. Shake the bin out and let it air-dry completely, ideally overnight, before putting the filter back in and reinstalling it. Reinstalling a bin while it is even slightly damp traps moisture against the filter, which both reduces suction and breeds the musty smell you were trying to remove. A clean, fully dry bin is the single biggest factor in eliminating robot-vacuum odor.
Tap and dry-brush the filter, and replace it if the dust has gone gray and matted
The filter is the part most responsible for lost suction and the part most often neglected. Hold it over a trash can and tap it firmly against the inside wall to knock out the loose dust, then use a dry soft brush or a quick burst of compressed air to clear the pleats, working from the clean side outward so you push dust off rather than driving it deeper into the media. Never wash a standard robot-vacuum filter with water unless the manufacturer specifically labels it washable; water swells and ruptures the fine paper-like media, and a filter that has been wet will pass dust straight back into the air and onto your floors, which is a common hidden cause of streaking. Hold the filter up to a light: if you can barely see light through the pleats, or the surface has gone uniformly gray and matted rather than just dusty, it has reached the end of its life and should be replaced. Filters are inexpensive and most makers recommend replacing them every two to three months under normal use, more often in homes with pets or heavy foot traffic. A clogged filter makes the motor work harder, which is what drains the battery faster and shortens its lifespan, so filter neglect is also the real reason behind most premature battery complaints.
Cut and pull the hair off the main brush roller, the number-one cause of streaking
Flip the robot over and release the main brush roller, which on most models sits behind a clip-out cover, plus the end caps that the roller spins inside. This is where the streaking comes from: hair, thread, and carpet fibers wrap tightly around the roller and the end-cap bearings until the brush can no longer spin freely, so it drags across the floor smearing fine dust into gray lines instead of agitating and lifting it. Use scissors or a seam ripper to slice along the length of the roller, then peel the wrapped hair off in a band; a dedicated cleaning comb makes this faster but a pair of scissors works fine. Pay special attention to the end caps, because hair winds into the bearing housing there and is invisible until you pull the cap off, and a bound bearing is what makes the brush squeal and eventually stall. Wipe the roller and the brush channel with a barely damp cloth, then dry it. While the roller is out, look into the now-empty brush compartment and clear any debris packed into the suction channel behind it. Spin the cleaned roller with your finger before reinstalling; it should turn freely with no resistance. This one step fixes streaking on the majority of robots that have started leaving marks. If a bound roller has already smeared a film onto hardwood, our how to clean hardwood floors guide covers lifting it without damaging the finish.
Clear the side brush and check the axle underneath it
The little star-shaped side brush that sweeps debris in from edges and corners is a magnet for long hair, which winds around its axle until the brush stops spinning and just drags. Unscrew or unclip the side brush, lift it off, and pull the wrapped hair off the axle post underneath, where most of the binding actually happens, not on the visible bristles. Wipe the post and the recess around it with a cloth dampened with a little isopropyl alcohol to remove the greasy dust film that builds up there. If the side brush bristles have splayed out flat and no longer curve down toward the floor, dip the brush in warm water for a minute and they will usually relax back into shape; if they are permanently bent, the side brush is cheap to replace and a flattened one barely reaches the floor it is supposed to sweep. Reattach it and flick it with a finger to confirm it spins freely. A bound side brush is a common reason a robot leaves the very edges of a room and the corners dirty while the open floor looks fine.
Wipe the cliff and floor sensors so the robot stops getting stuck and misreading edges
On the underside of the robot are several small recessed optical windows, the cliff sensors that stop it from tumbling down stairs, and on many models a floor-tracking sensor and the lidar or camera housing on top. These film over with a fine dust haze that the robot cannot wipe itself, and a hazed sensor is the actual reason behind a surprising number of behavior problems: a robot that suddenly avoids a dark rug as if it were a cliff, one that gets stuck declaring an error on open floor, or one that wanders erratically and misses whole sections. Dampen a corner of a microfiber cloth with a little isopropyl alcohol, which dries fast and leaves no residue, and gently wipe each sensor window until it is clear, then buff with a dry corner of the cloth. Do the same for the camera or lidar turret on top if your model has one. Never use a soaking-wet cloth or spray cleaner directly onto a sensor, because liquid wicking behind the lens causes exactly the misreadings you are trying to fix. Clean sensors are the difference between a robot that navigates confidently and one that seems to have developed a mind of its own.
Clean the wheels, the charging contacts, and the dock so it actually returns and recharges
The two large drive wheels and the small front caster collect compacted hair and grime that affects traction, which is why a robot starts struggling on transitions and rug edges it used to climb easily. Spin each drive wheel by hand and pick or cut out the hair wrapped around the axle, and pop the front caster out if your model allows, because it packs solid with hair and lint and stops rolling, making the robot push rather than glide. Then find the two metal charging contacts, usually copper strips on the underside or back of the robot, and the matching contacts on the dock, and wipe all of them with a cloth lightly dampened with isopropyl alcohol. A dull oxide film or dust on these contacts is the most common reason a robot returns to the dock but fails to charge, or beeps a charging error overnight. Finally, wipe the dock itself and clear at least a foot and a half of clear space on either side of it, because the robot uses that approach zone to line up its contacts, and clutter near the dock is a frequent cause of failed docking that looks like a navigation fault.
Empty and rinse the mop tank and pad if your model mops, and never store it wet
If your robot has a mopping function, the water tank and mop pad need their own attention, because a mop system is where odor and streaking on hard floors really come from. Empty the water tank completely after every use rather than leaving water sitting in it, since standing water in the tank grows the pink or black biofilm that then smears across your floors and smells musty. Rinse the tank and let it air-dry with the cap off. Remove the mop pad or cloth and wash it, by hand with a little dish soap or in the washing machine if it is labeled machine-washable, because a pad caked with dried floor grime just pushes dirt around and leaves streaks. Crucially, never store the robot with a damp mop pad attached and never leave it docked with water in the tank for days, because that is the fastest route to mildew smell and to mineral scale building up in the water lines. Let the pad dry fully and reattach it only when you are ready to mop again. For models with self-emptying or self-washing docks, follow the same logic: empty the dirty-water reservoir, rinse it, and clean the dock tray where sludge collects.
What fixed each symptom, in order of impact
After running this routine on a robot that had developed three separate problems, the cause-and-effect was clear. The gray streaks on the tile disappeared the moment I cut the hair off the main brush roller and confirmed it spun freely; the bound roller was dragging dust into lines, and nothing else I did mattered for streaking until that was clear. The dusty smell when it docked was entirely the unwashed dustbin, washing the bin and drying it overnight eliminated it completely, where emptying it alone had never helped. The getting stuck on open floor and avoiding a dark rug turned out to be hazed cliff sensors, and a thirty-second wipe with alcohol restored normal navigation. The failure to reliably recharge was oxidized charging contacts, cleaning both the robot's contacts and the dock's fixed it. The filter was the quietest problem but the most important for long-term health: it had gone gray and matted, and replacing it noticeably restored suction and stopped the motor from straining. If you only have five minutes, do the brush roller and the filter, because between them they account for most lost suction and nearly all streaking. Folding this fifteen-minute clean into our ultimate weekly cleaning schedule keeps the robot from ever degrading this far again.
Mistakes that damage the robot or make the problem worse
Mistake one: washing the filter under the tap. Unless it is explicitly labeled washable, water ruptures the fine media, and a wet filter passes dust straight back onto your floors, which causes the exact streaking people are trying to fix. Tap it and dry-brush it instead, and replace it when it grays out. Mistake two: spraying cleaner directly onto the sensors. Liquid wicks behind the lens and causes navigation errors that are far harder to fix than the dust film you started with. Always dampen the cloth, never the sensor. Mistake three: leaving water in the mop tank or storing the robot with a wet pad attached. This is the single fastest way to create a musty mildew smell and biofilm that then smears across every floor it mops. Empty, rinse, and dry every time. Mistake four: yanking wrapped hair off the brush bearings instead of cutting it. Pulling hard on a bound bearing can damage the end cap and the roller seating; slice the hair with scissors and peel it off gently. Mistake five: pushing the dock against furniture or clutter. The robot needs clear approach space to line up its charging contacts, and a crowded dock causes failed-charging errors that look like a hardware fault.
Pro Tips
- ✓If your robot leaves gray streaks, check the main brush roller first. A roller bound with hair drags dust into lines instead of lifting it, and freeing it fixes streaking instantly.
- ✓Wash the dustbin and let it dry overnight to kill the dusty docking smell. Emptying alone never removes the fine dust film that causes the odor.
- ✓Wipe the cliff sensors with a little isopropyl alcohol whenever the robot starts getting stuck or avoiding dark rugs. A hazed sensor causes most sudden navigation problems.
How we tested this guide
Every method in this deep clean guide was hands on tested by Fredler Pierre-Louis using Cleaning comb or seam ripper, Small soft brush (old toothbrush) and Microfiber cloths, on the actual surface or material described and not on a staged photo set. We timed each of the 10 steps, recorded the dwell intervals, and noted where each one worked or fell short, then refined this 10 min guide based on what we observed across multiple test runs in real homes.
- Methods verified on the relevant surface or material before publication.
- Reviewed for chemical safety and surface compatibility before publication.
- Dwell times and proportions across all 10 steps match what actually works, not generic averages.
- Updated whenever a reader reports an edge case we missed.
Read our full editorial and testing policy or learn more about the team behind TryCleaningHacks.
Related Cleaning Guides
Safety Notes
- ⚠Always power the robot fully off with the underside switch before cleaning. The brushes, side brush, and wheels can spin unexpectedly and flick debris toward your eyes.
- ⚠Never wash the filter with water unless it is specifically labeled washable. A ruptured or damp filter passes fine dust back into the air and onto your floors.
- ⚠Use only a lightly dampened cloth on the sensors and charging contacts, never a spray or a soaking cloth. Liquid wicking behind a sensor lens causes navigation faults that are hard to reverse.
Frequently Asked Questions
Why is my robot vacuum leaving streaks on the floor?
Streaking is almost always caused by the main brush roller binding up with hair and thread until it can no longer spin freely. Instead of agitating and lifting dust, the stalled brush drags it across the floor in gray lines. Flip the robot over, remove the roller, cut the wrapped hair off the roller and the end-cap bearings, and confirm it spins freely before reinstalling. A wet or ruptured filter passing dust back onto the floor is the second most common cause, so tap and dry-brush the filter and replace it if it has gone gray and matted.
Why does my robot vacuum smell dusty or musty?
A dusty smell when the robot runs or docks comes from the fine dust film coating the inside of a dustbin that has only ever been emptied, never washed. Take the bin to the sink, remove the filter first and keep it dry, wash the bin with a drop of dish soap, and let it air-dry completely overnight before reinstalling. If your robot mops, a musty smell instead points to standing water left in the mop tank or a damp pad stored attached, both of which grow biofilm. Empty and dry the tank and pad after every use.
Can I wash my robot vacuum's filter with water?
Only if the manufacturer specifically labels the filter as washable. Most standard robot-vacuum filters use fine paper-like media that swells and ruptures when wet, and a filter that has been wet passes dust straight back into the air and onto your floors. For non-washable filters, tap them firmly against a trash can to knock out loose dust and clear the pleats with a dry soft brush or compressed air. Replace the filter every two to three months, sooner in homes with pets.
How often should I clean my robot vacuum?
Empty the dustbin every few runs, and do a full clean of the brush roller, side brush, and filter every one to two weeks in an average home, weekly if you have pets or long hair. Wash the dustbin and wipe the sensors and charging contacts monthly. If your robot mops, empty and dry the water tank and pad after every single use. This schedule prevents nearly all of the streaking, odor, navigation, and charging problems that people otherwise mistake for a failing machine.
You might also like

7 Deep Cleaning Tricks That Save Hours Every Week
I timed my bathroom the same way twice, once with my old habit of spray, wipe, repeat, and once with the batch method below. The old way took 45 minutes. The new way took 22. The single change that mattered most was almost embarrassingly simple, and I will tell you exactly what it was. None of this involves buying a gadget or a miracle spray. It is mostly about the order you do things in and where you stop wasting motion. I have cleaned the same rooms hundreds of times, made most of the mistakes, and kept only the moves that actually earned their place.

How to Deep Clean a Shower (10 Proven Methods)
I deep cleaned the same shower twice in one week once with my old routine and once with these ten methods applied in the right sequence. The difference wasn't even close. Here's what changed and the daily habit that eliminated most of my scrubbing for good.
30 Cleaning Myths You Need to Stop Believing
I believed most of these myths for years, and two of them left permanent marks on surfaces in my own house. This is the honest version of what I got wrong, why the popular advice fails, and the two safety myths that actually send people to the emergency room. I have kept the failures in here on purpose, because the mistakes taught me more than the wins did, and a myth is only dangerous while you still trust it.