
8 Things You Can Clean With WD-40 (That You Didn't Know)
I keep a can of WD-40 under my bathroom sink, and not for squeaky hinges. It rescued a shower door that six bathroom sprays had given up on, and it has quietly wrecked one thing I still regret. WD-40 is not a cleaner in the way a bottle of glass spray is a cleaner. It is a blend of petroleum solvents and a light lubricating oil, and that combination is exactly what makes it eat through greasy, waxy, and mineral grime that water based cleaners just slide over. Here are the eight cleaning jobs it actually handles around a home, the exact dwell times and techniques I use for each, the results you should expect, and the handful of surfaces where it leaves permanent damage. I have kept this honest, including the two spots where the hack underperforms and the one mistake that cost me a matte black faucet.
Jump to a section
What You'll Need
Step-by-Step Instructions
Clear soap scum off a glass shower door
This is the job that made me a believer. My master bath door had a milky film maybe two years deep, and I had thrown a dedicated soap scum spray, a vinegar mix, and a razor scraper at it with almost nothing to show. I misted a thin coat of WD-40 across the glass, waited about two minutes, then wiped top to bottom in straight vertical strokes with a dry microfiber cloth. The film came off in one pass. The reason it works is that soap scum is a greasy mineral crust, a mix of body oils, dried soap fats, and hard water calcium, and the petroleum solvents in WD-40 break it apart from underneath rather than trying to scrub through the top layer. Two minutes is the sweet spot. Under a minute and thick film still drags; much past five minutes and the oil starts to bead and streak, which just makes more work. If the glass still looks hazy after the first wipe, do not spray the whole door again. Hit only the stubborn patches, wait one more minute, and buff again with a fresh dry cloth. The critical finishing step is washing the glass with warm water and a squirt of dish soap, because WD-40 leaves an oily haze that catches light otherwise and will actually attract new scum faster. I do this once a month now, and the scum never gets a foothold again. Expect a shower door that squeaks clean and beads water for a couple of weeks.
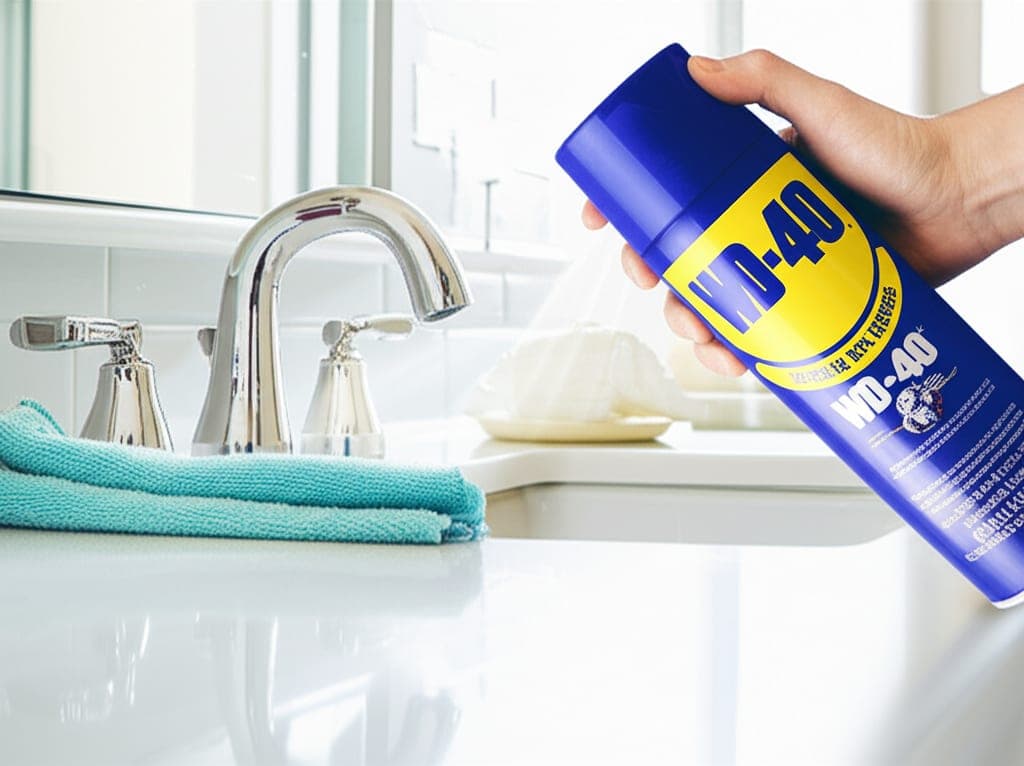
Strip lime and calcium off faucets
Chrome and brushed nickel faucets collect that chalky white ring where hard water pools and dries, usually right at the base and around the aerator. I spray WD-40 straight onto the fixture, let it work for about three minutes, then rub with a soft cloth. It cuts through built up scale that plain vinegar tends to shrug off once the deposit gets thick and crusty. For the crevices where the handle meets the base, I switch to the old toothbrush and work the solvent into the seam. One thing I learned the annoying way: on brushed nickel and matte black finishes, always buff along the direction of the factory grain you can see in the metal, never in circles. I once rubbed in little circles on a matte black faucet, and over a couple of months it went dull from thousands of tiny scratches I could not even feel at the time. That faucet never looked right again, and it is the mistake I still regret from the intro. If a heavy calcium ring will not budge, lay a WD-40 soaked cloth over it like a compress for five minutes so the solvent stays in contact instead of running off, then wipe. Finish by washing the fixture with warm soapy water so no oily film is left to smear the next time someone touches it. Expect fingerprints and water spots to wipe off far more easily for several days afterward, since the thin residual film resists them.
Dissolve sticker gunk and old tape
Price tags on new bathroom accessories, dried tape marks on a mirror, that gummy shelf liner residue in a cabinet, WD-40 handles all of it. I spray a little right on the sticky spot, count to sixty, then the residue rolls off under a cloth or peels away in one piece. Sixty seconds is usually enough for fresh adhesive; for old sun baked label glue that has gone hard and amber, give it two to three minutes so the solvent can soften the whole layer. It works because most adhesives are rubber or resin based, and the petroleum solvents swell and release that bond without scratching the glass, tile, or laminate underneath. Where it really shines is the foam mounting strips left by over the door hooks and command style hangers. Peeling those dry often takes paint or a chunk of drywall paper with them. A shot of WD-40 along the top edge of the strip, a short wait to let it wick behind the foam, and the strip lifts clean in one pull. If a thin film of glue stays behind, that is normal; add one more small spray, wait thirty seconds, and it wipes right off. Do not use this trick on unsealed wood or on the sticky side of anything you plan to reuse, since the oil ruins the tack. As always, wash the area with dish soap and warm water afterward so the spot does not stay tacky with oil and grab dust.
Wipe crayon off painted walls
My nephew redecorated a hallway wall with a red crayon during one visit, so I got to test this under real pressure with an audience. Crayon is basically colored wax, and the solvents in WD-40 dissolve wax easily, which is why it beats scrubbing with a sponge that just smears the color around. The key move is to put a small amount on a soft cloth, not straight on the wall, so you control exactly how much lands and where. I wiped the marks with gentle straight strokes, following the direction of the crayon lines, and on satin and semi gloss paint it lifted with no trace on the first try. Flat and eggshell paint is genuinely fussier, and I want to be honest that this is where the hack gets riskier. Those low sheen finishes are porous and burnish easily, so test a hidden corner behind furniture first, work with the lightest pressure you can, and follow immediately with a cloth that is barely damp rather than wet. Soaking flat paint leaves shiny burnished marks that look worse than the crayon did, and no amount of wiping brings the flat finish back. If a faint pink ghost remains on flat paint after a gentle pass, stop and switch to a magic eraser used dry and light, because pushing harder with solvent will polish a glossy patch into the wall. Finish any painted surface with a light pass of dish soap and water to pull off the oil so the spot does not sit darker than the surrounding paint.
Freshen up dingy tile grout
Grout near the tub and shower floor goes gray and grimy from soap film, body oil, and tracked in dirt that water based cleaners never fully lift. I spray WD-40 along the grout lines, let it sit around five minutes so the solvent can soak into the porous cement, then scrub with an old toothbrush in short back and forth strokes along the line. It loosens the embedded greasy grime that most bathroom sprays leave sitting right where it was. Be honest about what this is, though, because this is the second spot where the hack underperforms. It cleans surface staining, soap film, and general dinginess, but it is not a mold or mildew treatment and it does not disinfect. If your grout is black with actual mildew rooted into the cement, this will lighten the surface for a day and then the black comes right back, because the living mildew underneath is untouched. For that you need a dedicated mildew remover, used on its own and never mixed with anything. For tight grout lines I pop the straw onto the can and aim the spray right into the channel instead of soaking the whole tile, which keeps the residue where it belongs and cuts cleanup roughly in half. If the grout still looks gray after scrubbing, the discoloration may be a permanent stain or worn sealer rather than dirt, and resealing the grout is the real fix. Wipe everything down with a warm soapy cloth when the grout looks clean, then run a dry cloth over the tile so nobody slips on an oily floor.
Bring stainless steel back to a clean shine
Stainless towel bars, soap dispensers, and cabinet pulls show every single fingerprint and water spot. Here the key is to spray WD-40 onto the cloth, never onto the surface, then wipe along the grain of the metal in long straight passes. Roughly a dime sized amount of spray on the cloth covers a whole appliance door; more than that just leaves streaks you have to buff out. A thin oil layer lifts the prints and spots and leaves a light film that shrugs off new smudges for a few days instead of a few hours. This works on kitchen appliances too, and it is where I get the most mileage. My refrigerator door used to need wiping every single day, and a monthly buff cut that down to almost never, since hands slide off the oiled surface instead of leaving marks. One real caution for the kitchen: keep this strictly to the outside of appliances and well away from any surface that touches food or from the inside of a fridge or microwave, since WD-40 is not food safe. Also skip it on the stovetop and anywhere near a burner, because it is flammable. If you get streaks, that is a sign you used too much product; go over the piece a second time with a clean dry microfiber cloth using firm even strokes along the grain, and the streaks buff right out. Finish every piece with that dry buffing pass, and expect a warm even sheen rather than a wet looking gloss.
Free up a rusty screw or hinge
This is the original job WD-40 was built for, and it is genuinely handy around a bathroom where humidity rusts everything. Toilet seat hinge bolts, towel bar brackets, shower door pivots, and cabinet screws all seize up with rust and corrosion. I spray the penetrating oil right on the screw head and threads, then walk away for a solid five minutes, and longer if the rust is heavy, so it can creep down into the threads where corrosion has effectively welded the metal together. When I come back, the screw turns with a normal screwdriver instead of stripping the head out or snapping the bolt. That saved me from replacing a whole toilet seat once over one rusted bolt that looked hopeless. If a badly seized bolt still will not move after the first soak, spray it again and give it fifteen to twenty minutes, then gently rock the fastener back and forth a few degrees each way rather than forcing it in one direction, which breaks the rust bond without shearing the metal. For an overhead hinge, spray onto the straw tip or a cloth first so the oil does not run down your arm or drip onto the floor. Wipe up any drips right away so the oil does not run down onto surfaces below, and keep it off the floor entirely, since even a small slick is a slip hazard. Expect a fastener that turns smoothly and, as a bonus, stays rust free and easy to remove for months afterward.
Erase black scuff marks from tile and vinyl floors
Rubber soled shoes leave black scuffs on bathroom tile, entryway tile, and vinyl or linoleum, and those marks laugh at a regular mop. A quick spray of WD-40, one minute of waiting, and a wipe with a cloth takes them off, because the solvent breaks down the transferred rubber compound without touching the floor finish underneath. For textured or matte tile I work it into the grooves with the small nylon brush, since a flat cloth skips right over the low spots where the scuff actually sits. This is much faster than grinding away with a melamine eraser, which is what I used to do and which can dull a glossy tile if you lean on it. Keep the treated area small and targeted; you are cleaning a scuff, not the whole floor, so spot spraying keeps the oily zone contained. The one step you absolutely cannot skip is mopping the spot afterward with warm soapy water, then drying it. Leaving oil on a floor is a real slip hazard, worse on smooth vinyl than on textured tile, and the residue attracts grime fast so the clean spot turns into a dark magnet within a day. If a faint gray shadow remains after the first wipe, the scuff has ground into a textured surface; give it one more short spray, scrub with the nylon brush, and wipe again. The whole wipe, scrub, and mop routine runs about fifteen to twenty seconds per scuff once you have the rhythm.
Pro Tips
- ✓Spray onto the cloth, not the surface, for anything vertical or delicate. You use less product, you control exactly where it lands, and you avoid overspray drifting onto the floor or a nearby stone counter.
- ✓Treat the dish soap and warm water rinse as part of the method, not an optional finish. WD-40 leaves an oily film that grabs new dirt within a day if you leave it, so I keep a bowl of soapy water ready before I even start.
- ✓Use the flip up straw for grout lines, hinges, and screw threads. Aiming a precise stream into a narrow channel keeps the residue off the surrounding tile and cuts the cleanup afterward roughly in half.
- ✓Match the dwell time to the mess. A greasy fingerprint needs about a minute, thick calcium scale wants three minutes or a soaked cloth compress for five, and a rusted bolt can take fifteen to twenty. Wiping too soon is the most common reason people think it did not work.
- ✓Keep a dedicated set of cloths for WD-40 jobs and wash them separately. The oil transfers, and a cloth that has wiped WD-40 will smear residue onto glass or a mirror the next time you grab it for a quick clean.
- ✓Warm the surface a little first in cold weather. A faucet or tile that has been sitting cold lets the solvent evaporate slower and work better; on a freezing morning I run warm water over a fixture for a few seconds before I spray.
How we tested this guide
Every method on this page was hands on tested by Fredler Pierre-Louis on the actual surface or material described, not on a staged photo set. We recorded the timing, the dwell intervals, and the conditions where each method worked or fell short, then refined the steps based on what we observed across multiple test runs in real homes.
- Methods verified on the relevant surface or material before publication.
- Reviewed for chemical safety and surface compatibility before publication.
- Dwell times and proportions match what actually works, not generic averages.
- Updated whenever a reader reports an edge case we missed.
Read our full editorial and testing policy or learn more about the team behind TryCleaningHacks.
Related Cleaning Guides
Safety Notes
- ⚠WD-40 is petroleum based and flammable. Never spray it near an open flame, a gas stove pilot light, a lit candle, or a water heater. The fine aerosol mist can ignite in the air, so keep flames well away and give the room airflow before and after.
- ⚠Never mix WD-40, or the dish soap rinse, with bleach or other cleaning chemicals, and do not use it in the same session as a bleach based mildew remover in a closed bathroom. Use one product, rinse fully, and ventilate before reaching for another. Mixing cleaners can create dangerous fumes.
- ⚠Do not use it on natural stone. The petroleum compounds soak into porous marble, granite, and travertine and leave an oil stain you cannot pull back out. This one is permanent, so test any surface you are unsure about in a hidden spot first.
- ⚠Keep it off fabric. WD-40 does not just stain cloth, it binds with the fibers and sets the stain. If it touches a towel or your clothes, work undiluted dish soap into the spot before it dries and wash promptly in the hottest water the fabric allows.
- ⚠Keep it away from food surfaces and skin contact points. WD-40 is not food safe, so never use it inside a fridge or microwave, on cutting boards, or on anything that touches food. Wash your hands with soap after using it.
- ⚠Work in a ventilated room and wear gloves. Avoid breathing the spray, keep it away from your eyes, and store the can upright and out of reach of children and pets. If you feel lightheaded, step out for fresh air.
- ⚠Always mop and dry any floor you treat. Oily residue on tile or vinyl is a genuine slip hazard, especially in a bathroom where feet are often bare and wet.
Frequently Asked Questions
Does WD-40 really clean better than regular bathroom sprays?
For a few specific jobs, yes, and I was surprised too. It out cleaned six products on my hard water shower door because it dissolves the greasy mineral crust from underneath instead of scrubbing the top. It is not an everyday cleaner, though. For general grime, mildew, or disinfecting, a proper bathroom cleaner is the right tool. Think of WD-40 as a specialist for waxy, greasy, mineral, and adhesive messes, not a replacement for your daily spray.
How do I get rid of the oily film WD-40 leaves behind?
Wash the spot with warm water and a little plain dish soap right after the WD-40 has done its job, then dry it with a clean cloth. Dish soap is a degreaser, so it lifts the oily residue that plain water just beads off of. On floors especially, do not skip this, since leftover oil is a slip risk and a dust magnet. If the spot still feels slick after one wash, go over it a second time; two quick soapy passes fully clear it.
Is it safe on all surfaces?
No. Skip natural stone like marble and granite, because the solvents stain porous stone permanently. Keep it off fabric and off unsealed wood, and be gentle on flat or eggshell paint where it can burnish a shiny mark. It is fine on glass, chrome, stainless steel, sealed tile, laminate, and vinyl. Never use it on food surfaces or inside appliances. When in doubt, test a hidden area first and wait a few minutes to see how the surface reacts.
How long should I let WD-40 sit before wiping?
It depends on the mess. Give it about two minutes on shower glass, three minutes on faucet scale, one minute on stickers and floor scuffs, and five minutes on grout. Rusted screws want a full five minutes or longer. The most common mistake is wiping too soon, which makes people think it failed. If something is stubborn, a WD-40 soaked cloth laid over it as a compress keeps the solvent in contact instead of running off.
Will WD-40 damage my toilet seat, cabinet finish, or chrome over time?
Used correctly and rinsed off, no. On chrome, sealed cabinet hardware, and standard plastic toilet seats it is safe and even leaves a light protective film. The real risks are circular rubbing on brushed or matte finishes, which micro scratches them, and leaving oil on unrinsed surfaces, which attracts grime. Always buff along the grain, and always finish with the soapy rinse. Avoid it entirely on natural stone, fabric, and anything porous or unsealed.
Can I use WD-40 to remove mold or mildew in the bathroom?
No, and this is worth being clear about. WD-40 will wipe the surface discoloration off grout or caulk for a day, but it does not kill mold or mildew, so the black returns quickly because the living growth underneath is untouched. For actual mildew you need a dedicated mildew or mold remover used on its own, never mixed with WD-40 or anything else, followed by fixing the moisture problem. WD-40 is for grime and staining, not for anything living.